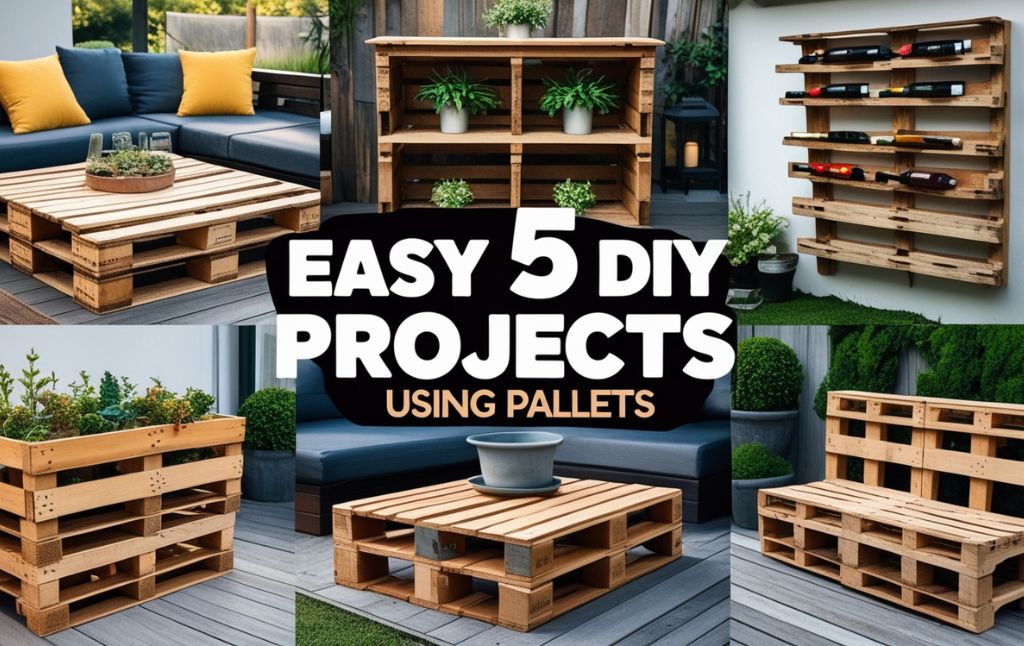
Wooden pallets, often discarded after serving their purpose in shipping and logistics, have become a treasure trove for DIY enthusiasts.
With their rustic charm and versatility, pallets can be transformed into stunning furniture, home decor, and even garden structures.
Whether you’re a seasoned DIYer or a beginner looking to dive into your first project, using pallets offers an affordable and eco-friendly way to create unique pieces for your home.
In this blog, we’ll explore 5 DIY projects using pallets that range from simple to more advanced.
Each project includes detailed instructions, tips for sourcing and preparing pallets, and creative customization ideas. So grab your tools, and let’s get started!
1.) Pallet Coffee Table with Storage
A pallet coffee table adds a rustic touch to your living room while offering practical storage space. It’s a perfect blend of form and function.
Materials Needed:
- 2 wooden pallets
- Sandpaper or electric sander
- Wood stain or paint
- Clear sealant
- Caster wheels (optional)
- Nails or screws
- Hammer or drill
Source Your Pallets: Choose pallets that are in good condition, free from mold or rot.
Prep the Wood: Sand the pallets thoroughly to remove splinters and rough edges.
Stack and Secure: Place one pallet on top of the other, aligning them neatly. Secure with screws or nails.
Customize: Apply wood stain for a natural look or paint for a pop of color. Seal with a clear coat to protect the surface.
Add Wheels: For easy mobility, attach caster wheels to the bottom corners.
Storage Hack: Use the spaces between the pallet slats to store books, magazines, or remote controls.
2.) Vertical Pallet Garden
A vertical pallet garden is perfect for small spaces, adding greenery to balconies, patios, or even indoor areas. It’s an easy way to grow herbs, flowers, or succulents
Materials Needed:
- 1 wooden pallet
- Landscape fabric
- Staple gun and staples
- Potting soil
- Plants (herbs, flowers, succulents)
- Sandpaper
- Wood stain or paint (optional)
Prepare the Pallet: Sand the pallet to remove any rough spots. Stain or paint if desired.
Attach Fabric: Staple landscape fabric to the back, bottom, and sides of the pallet to create planting pockets.
Fill with Soil: Stand the pallet upright and fill each pocket with potting soil.
Plant Your Garden: Insert plants into the soil, arranging them to create a balanced, visually pleasing display.
Water and Maintain: Water regularly and ensure your pallet garden receives the right amount of sunlight.
3.) Pallet Headboard
A pallet headboard brings a cozy, rustic vibe to your bedroom. It’s an affordable way to add a unique focal point to your space.
Materials Needed:
- 2-3 wooden pallets (depending on bed size)
- Sandpaper or electric sander
- Wood stain or paint
- Clear sealant
- Screws and wall anchors
- Drill
Select and Prepare Pallets: Choose pallets with interesting wood grain. Sand thoroughly.
Arrange Pallets: Lay the pallets out to fit the width of your bed. Cut to size if necessary.
Stain or Paint: Apply your chosen finish, then seal with a clear coat.
Mount the Headboard: Use screws and wall anchors to securely attach the pallets to the wall behind your bed.
Add Finishing Touches: Consider adding string lights or attaching small shelves for decor.
4.) Pallet Outdoor Lounge Chair
Perfect for relaxing on your patio or in your garden, a pallet lounge chair combines comfort with rustic charm. Plus, it’s surprisingly easy to make!
Materials Needed:
- 2-3 wooden pallets
- Sandpaper or electric sander
- Wood screws
- Drill
- Wood stain or outdoor paint
- Weatherproof cushions
Prepare the Pallets: Sand the pallets to remove splinters. Stain or paint for added durability.
Construct the Base: Stack two pallets on top of each other and secure them with screws.
Create the Backrest: Cut a pallet in half and attach it to the base at a slight angle.
Secure the Structure: Reinforce with additional screws and brackets if needed.
Add Cushions: Place weatherproof cushions on the seat and backrest for comfort.
5.) Pallet Wine Rack
A pallet wine rack is both functional and stylish, perfect for displaying your favorite bottles and glasses in your kitchen or dining area.
Materials Needed:
- 1 wooden pallet
- Saw
- Sandpaper
- Wood screws
- Drill
- Wood stain or paint
- Clear sealant
Cut the Pallet: Saw the pallet to the desired size for your wine rack.
Sand and Finish: Sand the wood smooth, then stain or paint and seal.
Create Glass Holders: Cut notches into the bottom plank to hold wine glasses upside down.
Mount the Rack: Use screws and wall anchors to securely attach the rack to the wall.
Add Your Wine: Fill the top section with wine bottles and hang glasses below
Conclusion
Pallets offer endless possibilities for creative, budget-friendly DIY projects. From functional furniture to stylish home decor, these five projects showcase the versatility and charm of reclaimed wood.
Whether you’re looking to add a rustic touch to your living space or create practical storage solutions, pallet projects are a great way to flex your DIY muscles while being kind to the environment.
So, roll up your sleeves, gather your tools, and start transforming those humble wooden pallets into stunning, one-of-a-kind pieces for your home!


