

Looking for a simple, budget friendly way to add a touch of handmade charm to your home?
Get ready to create gorgeous, intricate string orbs that can be used as enchanting lanterns, decorative bowls, or unique accent pieces.
This project is incredibly satisfying and requires just a few basic craft supplies. Let’s get started!
What You’ll Need:
- Balloons
- Cotton thread, embroidery floss, or thin yarn in your favorite colors
- White PVA glue (standard school glue works perfectly)
- A sewing needle
- Scissors
- Optional: Battery operated fairy lights for a magical glow
Step by Step Instructions:
Step 1: Prepare Your Balloon Mold
First, inflate a balloon to your desired size. This will be the mold for your orb, so the bigger you blow it up, the larger your final lantern will be. Tie the knot securely.
Step 2: The Magic Glue Technique
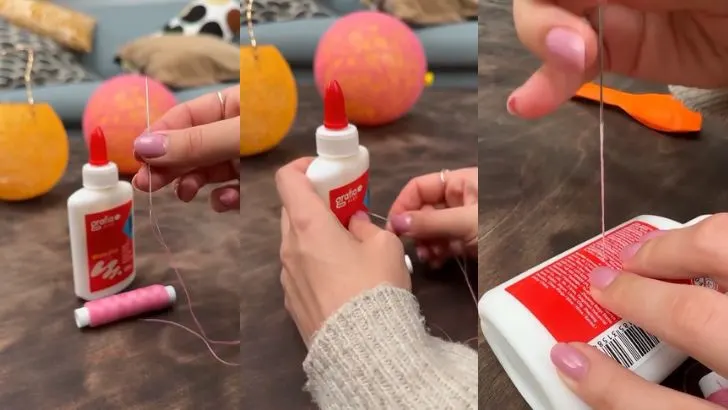
This next step is a clever trick for getting a perfectly even coat of glue on your thread without any mess.
Thread your needle with the end of your string spool. Carefully push the needle straight through your bottle of glue, entering one side and exiting the other.
Pull the needle and a little bit of thread all the way through. Now, as you pull the thread from the spool, it will pass directly through the glue, getting completely coated on its way to your balloon.
Step 3: Wrap it Up!
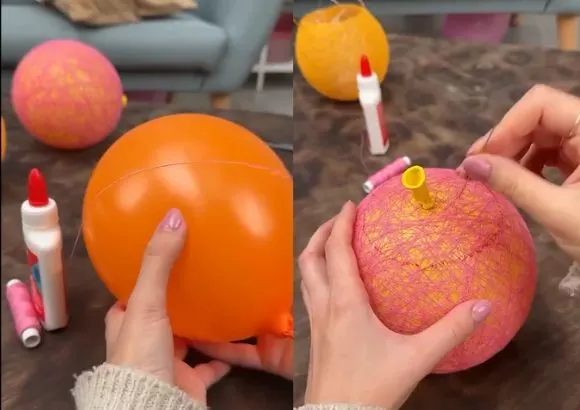
Take the end of your now glue soaked thread and begin wrapping it around the inflated balloon.
There’s no right or wrong way to do this! Wrap in all directions horizontally, vertically, and diagonally to create a beautiful, random web of string.
Continue wrapping until you have achieved the desired density. Once you’re satisfied, snip the thread.
Step 4: Patience and Drying Time
Find a safe place to let your string covered balloon dry completely. You can hang it up or rest it on a disposable cup to prevent it from sticking to any surfaces.
This is the most important step, so be patient! It can take 24 hours for the glue to fully harden. The orb should feel stiff and solid to the touch when it’s ready.
Step 5: The Big Reveal!
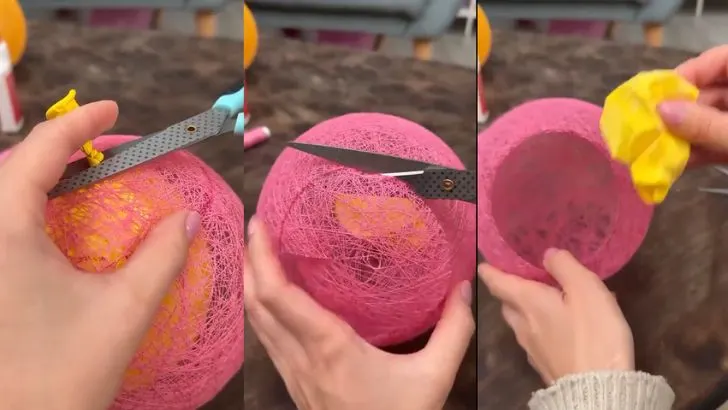
Once your orb is completely dry and hard, it’s time for the most satisfying part. Take your scissors or a pin and pop the balloon inside! The string structure will hold its spherical shape perfectly.
Using your scissors, carefully cut a neat, circular opening at the top of the orb (where the balloon’s knot was). This allows you to reach inside and easily remove the deflated balloon.
Step 6: Finishing Touches
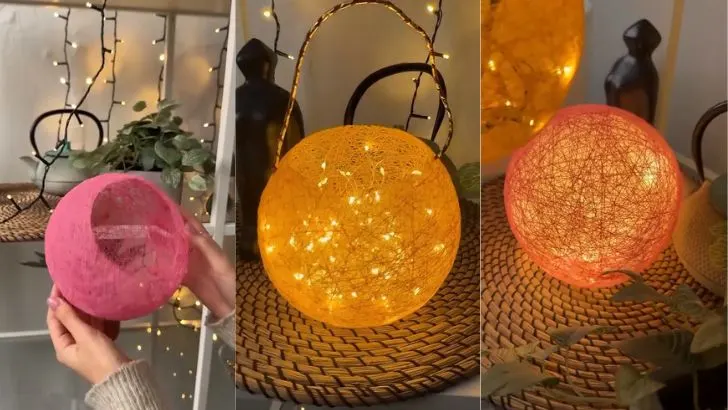
Your beautiful string orb is now complete! You can place it on a shelf as a delicate piece of art or fill it with battery operated fairy lights.
The light shining through the intricate threads creates a warm, mesmerizing glow, perfect for adding a cozy ambiance to any room. Create a few in different colors and sizes for a stunning display.
Fun & Easy Halloween DIYs Glowing Jar & Bat Candle
2 Spooky & Easy DIY Glowing Jars for Halloween
5 Creative No Carve Pumpkin Painting Ideas for a Spooktacular Halloween!
3 Spooktacular and Creative Pumpkin Carving Ideas for Halloween
3 Whimsical Autumn Leaf Crafts to Make with Kids
3 Fun and Easy Fall Tree Crafts for Kids (with Free Printable!)
Explore the Parts of an Apple with This Fun Felt Craft (Free Printable!)
A Fun and Personalized Apple Name Craft for Kids
3 Fun and Easy Apple-Themed Activities for Kids (with Free Printables!)


