
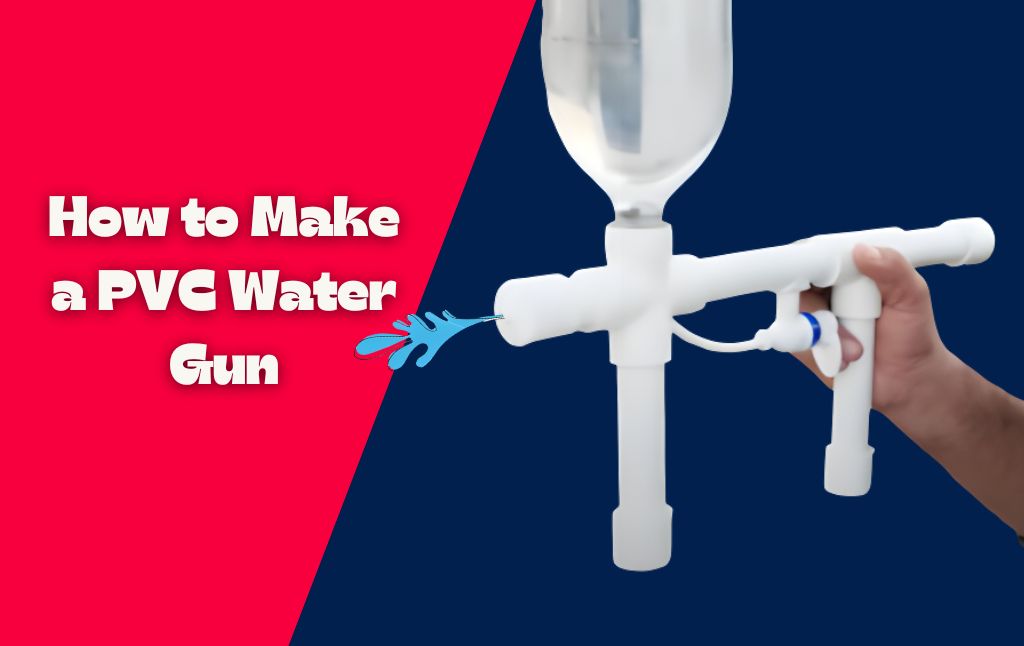
Creating a high-pressure water gun at home can be a fun and educational experience. Combining elements of basic engineering and your creativity could definitely enhance your experience of indulging in a water fight.
A homemade PVC water gun can be used for multiple purposes, like cleaning your bike and cycles. You can also impress your friends with your homemade gadget or simply enjoy a refreshing water fight on a hot sunny day.
If you are also keen to learn about making a homemade water gun at an affordable price, then you are at the right place. We discussed all the essential materials, safety precautions, and step-by-step instructions to make a powerful water gun.
You’ll learn to create a water gun using everyday household items and affordable tools.
Many Water Blaster lovers are looking for a water-powered Automatic Sniper Rifle DIY project, which you can complete on this platform.
So what are you waiting for? Let’s jump into this blog and learn how to make a high-pressure water gun.
Materials Required:
1.) 1 Long PVC pipe (around 26.67 millimetres in diameter and 5 feet long) and 4 PVC end cap
2.) 1 Bicycle air pump
3.) 1 PVC pipe sheet
4.) 1 RO Tap
5.) 4 way tee PVC pipe joint (quantity 1) and PVC Tee Joint (quantity 1) appropriate for 26.67 millimetres in diameter PVC pipe
6.) M-Seal 50 ml CPVC Solvent Cement
7.) One Pen refill (ink tube removed)
8.) One bottle (1.5 liter)
9.) One 3M 600 Grit Sandpaper
10.) 1 RO Pipe
11.) 1 Bicycle Rubber Tube Valve
12.) 1 Super Glue / AB Casting Repair Glue Adhesive
Safety measures you need to follow:
● Firstly, adult supervision is highly recommended while making this gun, especially when using the cutting tools and solvent cement.
● You must wear safety glasses to protect your eyes from flying debris while cutting the PVC pipes.
● You should be cautious when handling the finished water gun, as it can shoot high-pressure water. Avoid aiming it at people or animals.
● Another safety measure you need to follow is to keep this gun away from kids as they can harm each other.
If you want to skip this big water gun and make a mini water gun by following easy steps, you can also make that.
Pressurized PVC Water Gun making steps
Now let’s see how to make a high-pressure water gun:
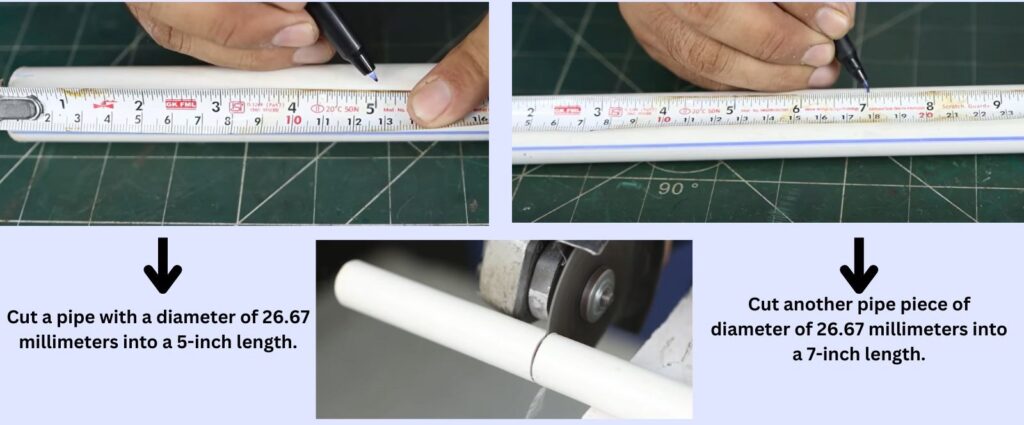
1.) Cutting the PVC Pipes:
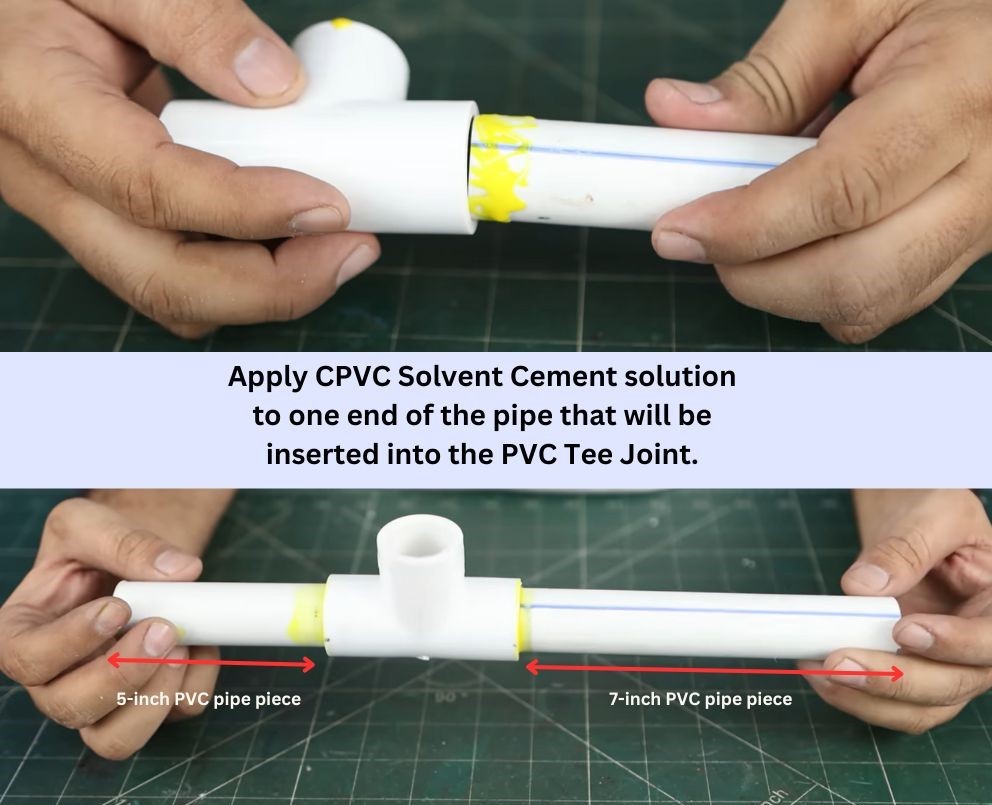
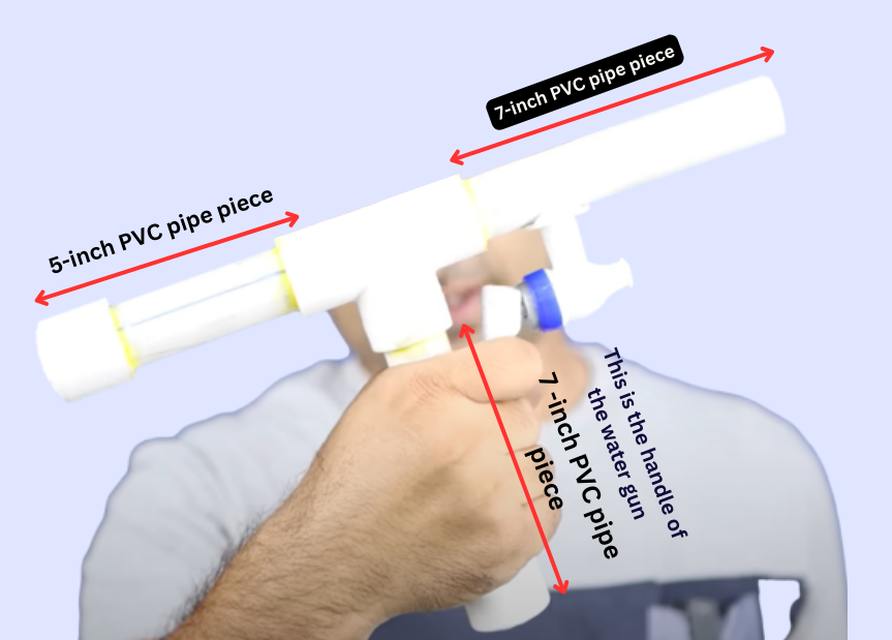
Using a saw appropriate for PVC pipes, cut the long pipe into two desired lengths, 5 inch and 7 inch long.
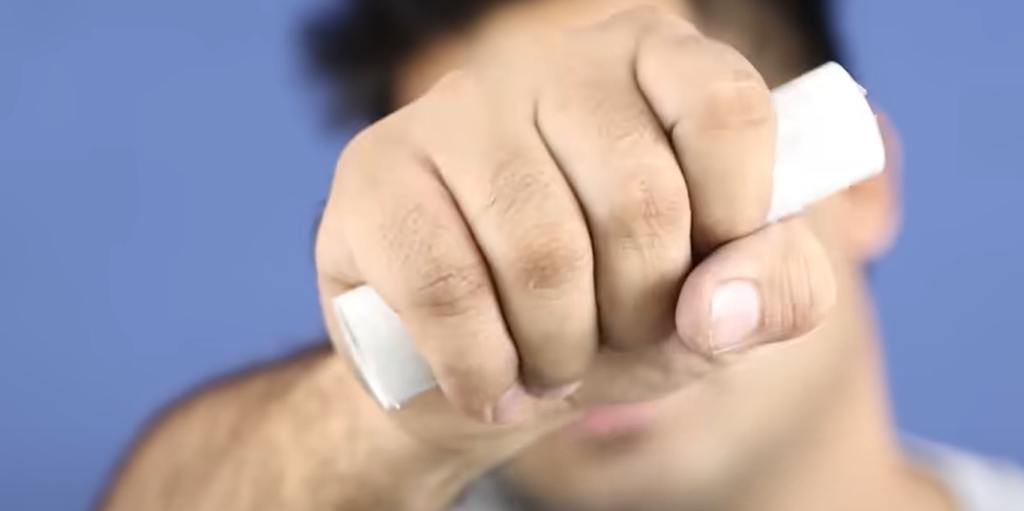
Apart from this, we have to cut another two small pieces from the remaining pipe. You can cut these pieces of pipe according to the grip of your palm because it will make the handle of our water gun. For this, you can cut a piece of 7-inch-long PVC pipe.
To make the front part of the water gun, we will need another piece of PVC pipe, which should be 3 inches long.
You need to cut a total of five pieces from a pipe that is 26.67 millimeters in diameter and 5 feet long. The lengths of the pieces should be as follows:-
- One piece measuring 5 inches in length
- Three pieces, each measuring 7 inches in length
- One piece measuring 3 inches in length
2.) The cut pipe pieces need to be connected using PVC Tee Joint:
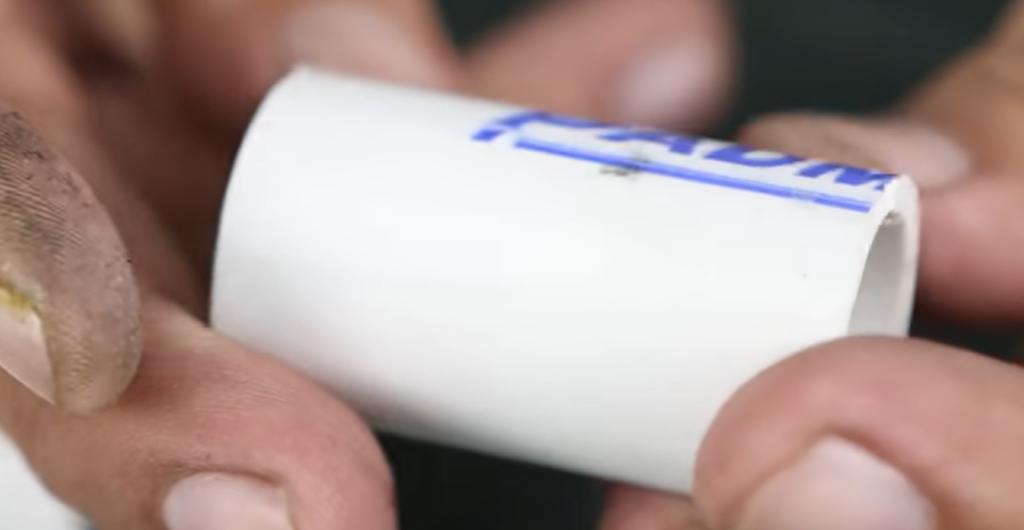
Now, we must connect a 5-inch PVC pipe to one end of the PVC Tee Joint with the help of a CPVC Solvent Cement solution. Precisely opposite to the joined part, you have to connect a piece of 7-inch PVC pipe. (Note that this is not the 7-inch pipe, which is why we have cut these for the handle of the water gun. Keep the two pieces of pipe of whatever length you have cut for the handle aside for now.)
3.) Preparing the Short PVC Pipe with Tap:
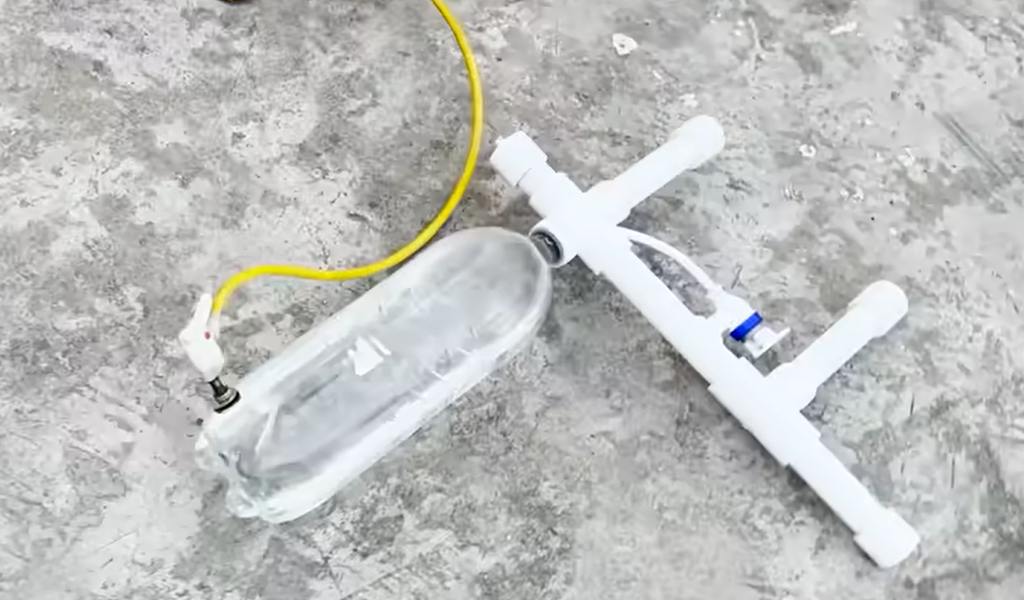
After connecting the pipe pieces to the PVC Tee Joint, you have to make a hole in the 7-inch pipe part to connect the RO Tap.
We have to make the hole for the RO Tap at the lower part of the 7-inch pipe. You can guess with the help of the image given below.
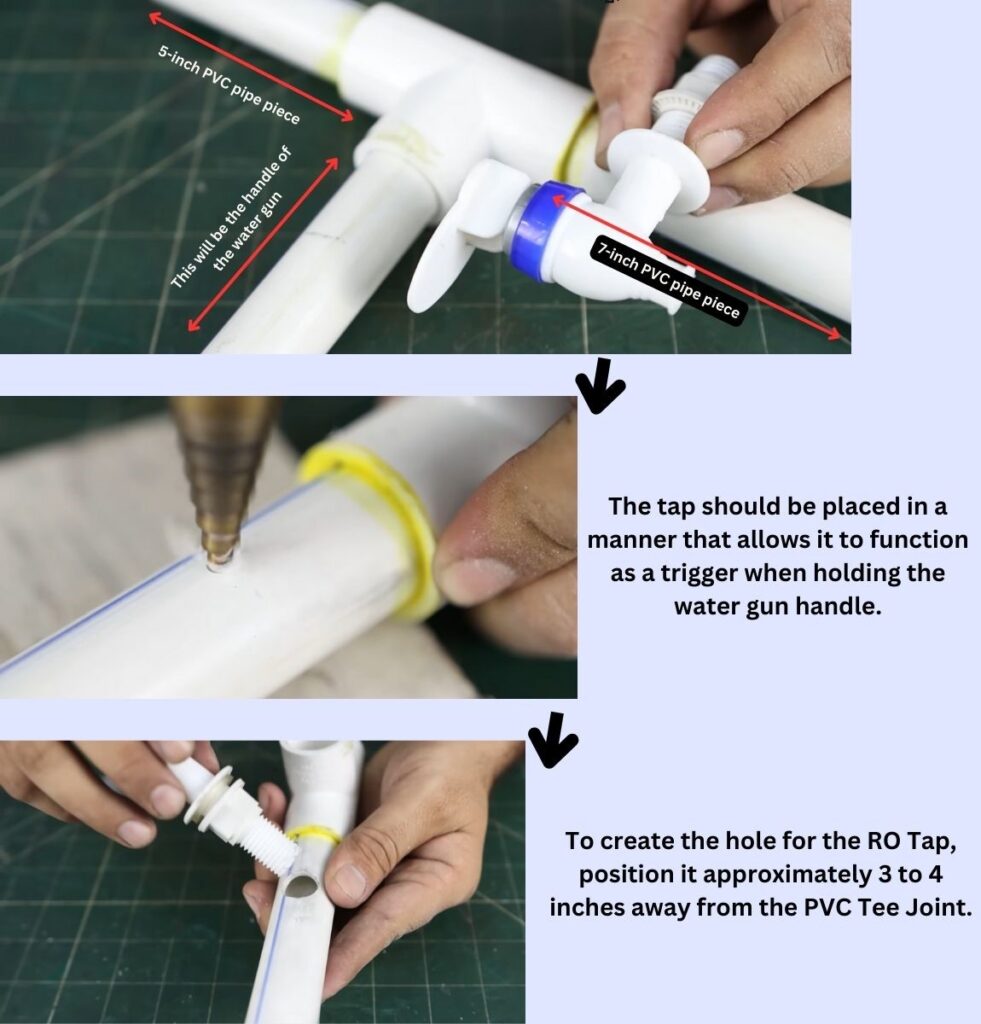
Drill a hole on the side large enough to fit the tap properly on one of the short pipes. Attach the tap to the drilled hole in the short pipe, ensuring a secure fit.
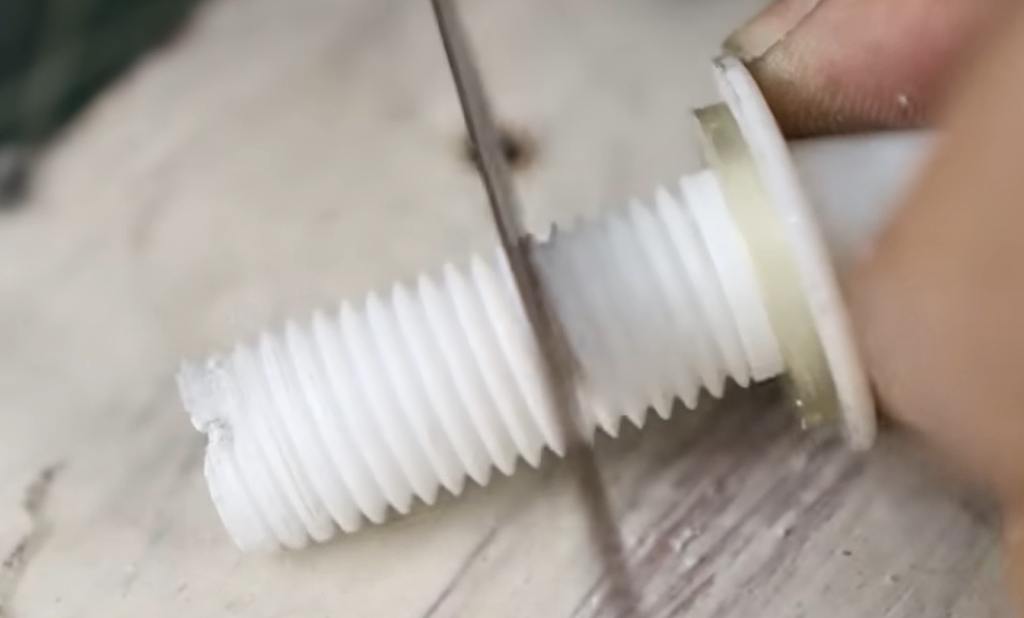
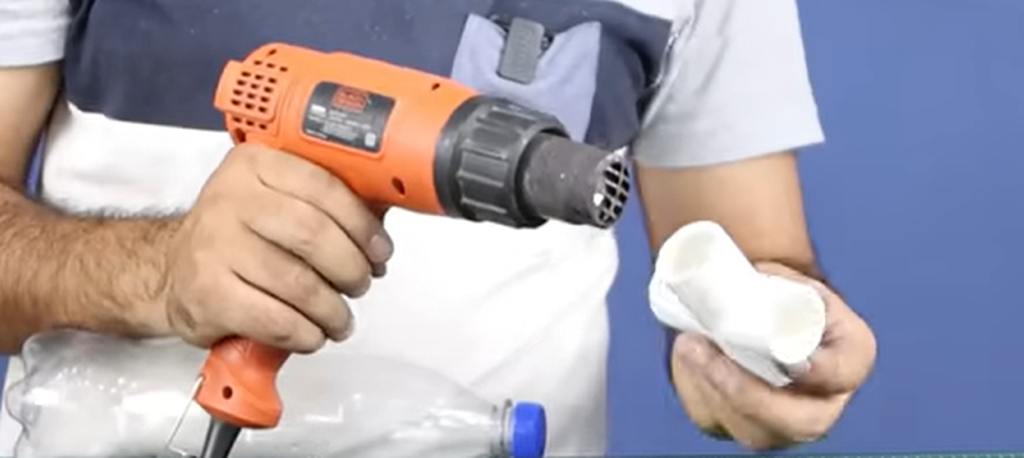
The blot and rubber bush must be removed from the RO Tap’s connector thread and cut in half so that the RO Tap can easily fit into the hole made in the PVC pipe.
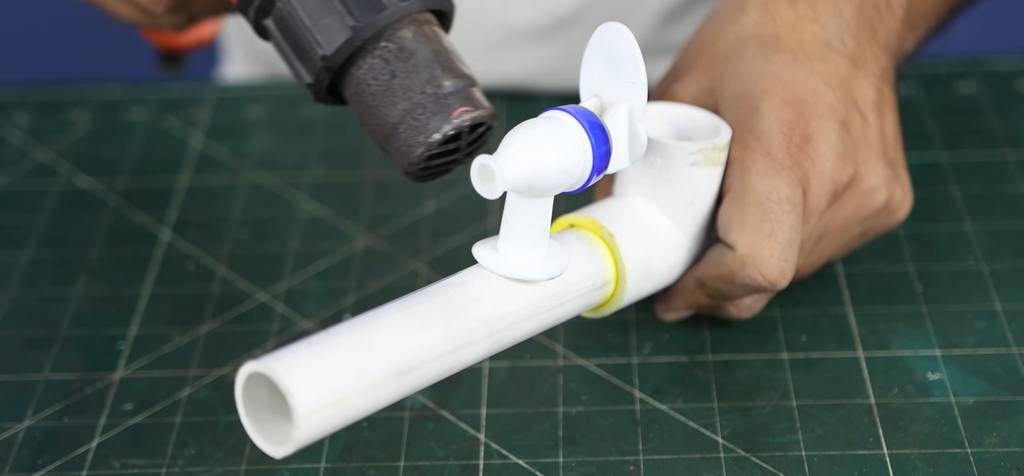
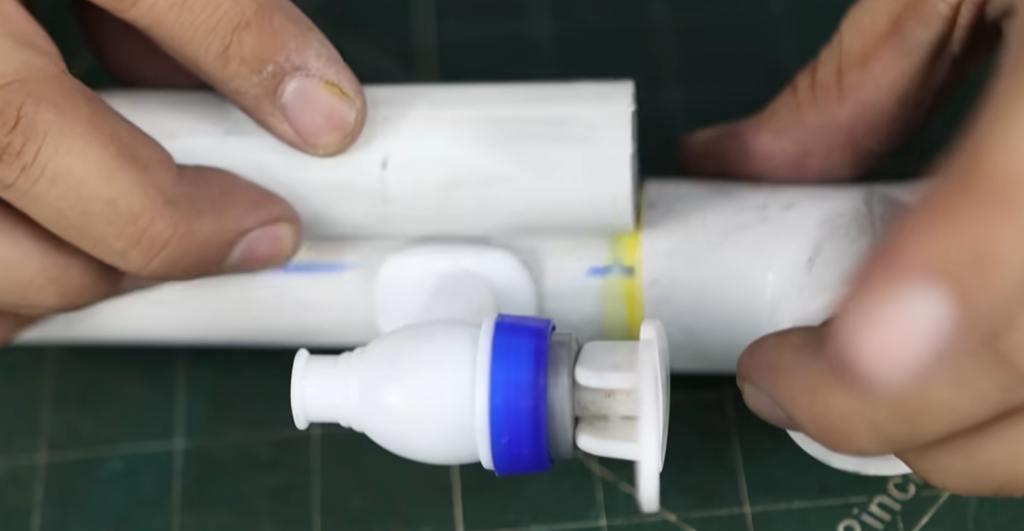
Now, connect the RO Tap to the PVC pipe. To properly seal the joint between the two, use a hot air gun to blow hot air between the connector of the RO Tap and the joint of the PVC pipe. Heat the plastic of the RO Tap connector until it melts slightly and sets well, ensuring that the RO Tap remains securely in the desired position.
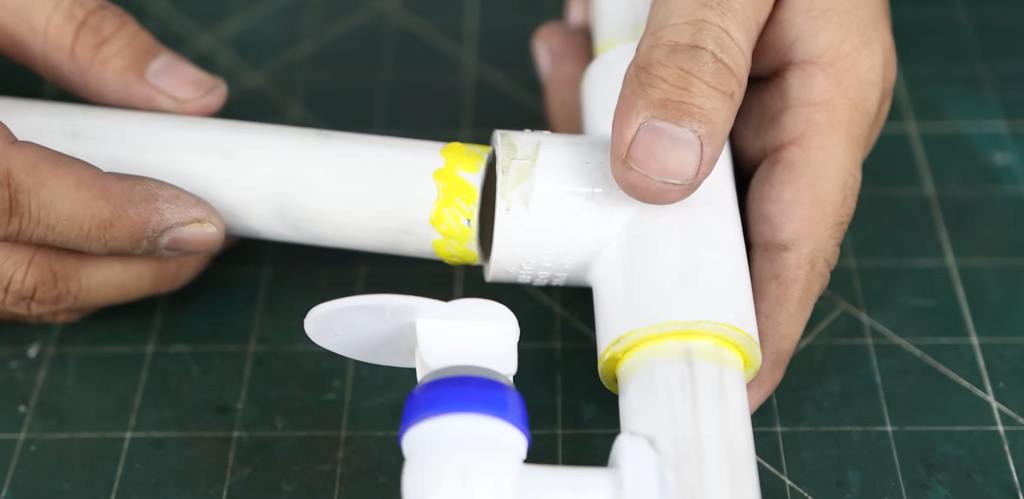
4.) Turn to make a water gun handle.
Now it’s time to use one of the two 7-inch pipe pieces you cut to make the handle of your water gun. Apply CPVC Solvent Cement solution on one side of that PVC pipe piece and connect it to the remaining PVC Tee Joint.
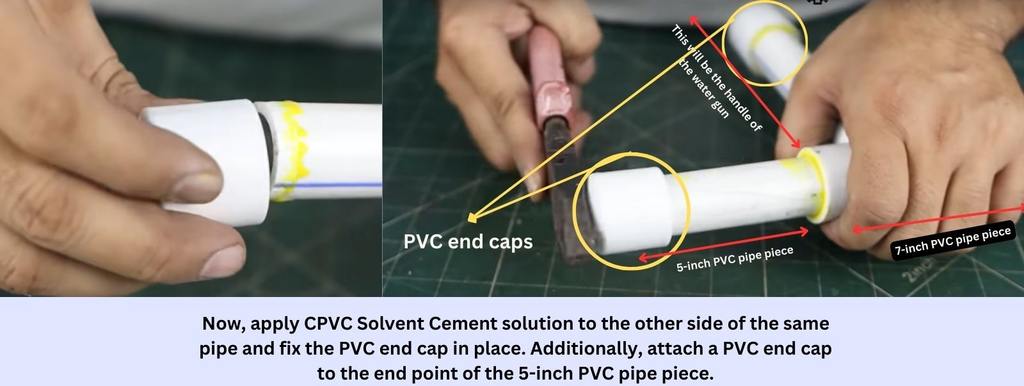
Now, apply CPVC Solvent Cement solution to the other side of the same pipe and fix the PVC end cap in place. Additionally, attach a PVC end cap to the end point of the 5-inch PVC pipe piece.
5.) Attaching the water tank to the water gun assembly.
Now, we have to prepare the remaining parts of the water gun, which we will first prepare for the assembly part of our water gun’s water tank.
For this, you will need an empty Coke bottle of 2.25 or 1.5 litres; you are free to choose any empty Coke bottle at your convenience. For this water gun, we will use an empty 2.25-litre Coke bottle. First, we must fix the bottle cap inside a four-way tee PVC pipe joint.
For this, we will again use a hot air gun and run it around the upper part of one joint of 4-way tee PVC pipe joints so that it becomes soft and we can easily insert the bottle cap inside it.
(Note that the bottle cap must be inserted into the PVC pipe joint together with the bottle.)
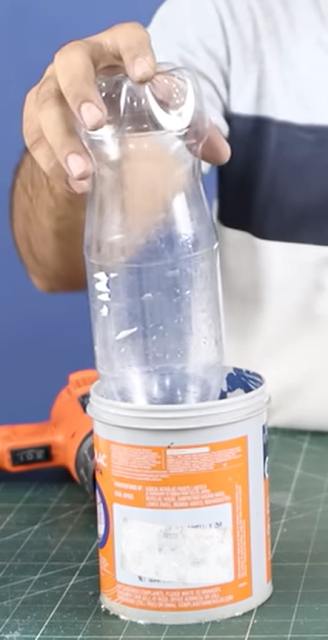
After inserting the bottle into the joint, it must be immersed in cold water for 2 minutes so that the joint of the PVC pipe tee can be set in the shape of the bottle cap.
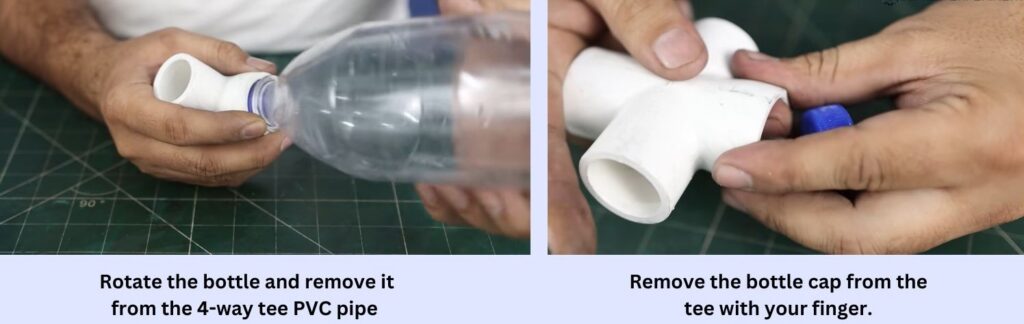
Now rotate the bottle and remove it from the 4-way tee PVC pipe. Later, remove the bottle cap from the tee with your finger.
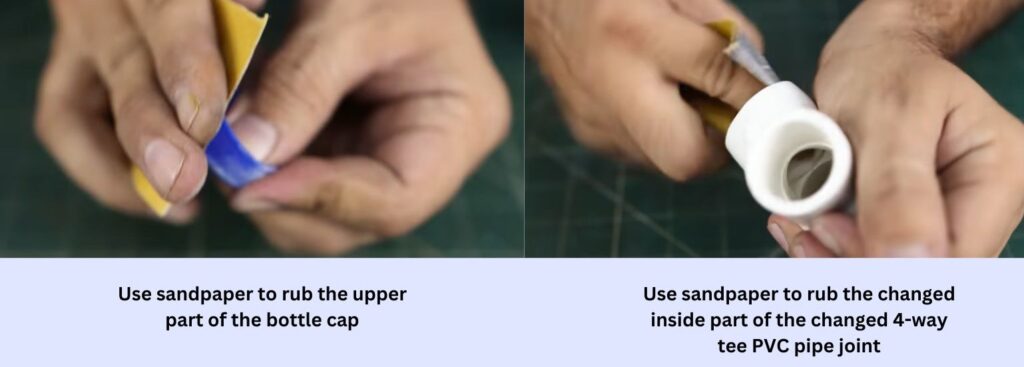
Now, use sandpaper to rub the upper part of the bottle cap and the inside part of the changed 4-way tee PVC pipe joint.
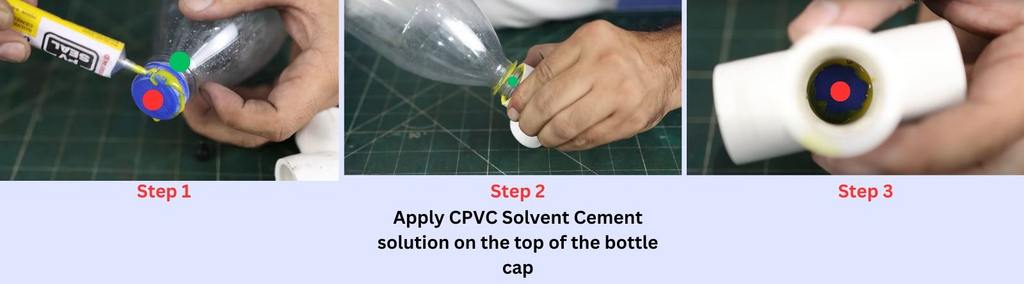
Step1:- Put the bottle cap back on the bottle and apply CPVC Solvent Cement solution on the top of the bottle cap. Similarly, Step3:- you must apply CPVC Solvent Cement solution on the inner part of the changed four-way tee PVC pipe joint. (Note that you have to apply CPVC Solvent Cement solution from the direction opposite to the PVC pipe changed joint.)
Step2:- Insert the bottle into the changed joint of the 4-way tee PVC pipe with the cap and rotate it to separate it.
6.) We have reached the second-to-last step in making our water gun.
Take an RO pipe. It will be approximately 0.30 meters long, and a PVC pipe sheet will be required.
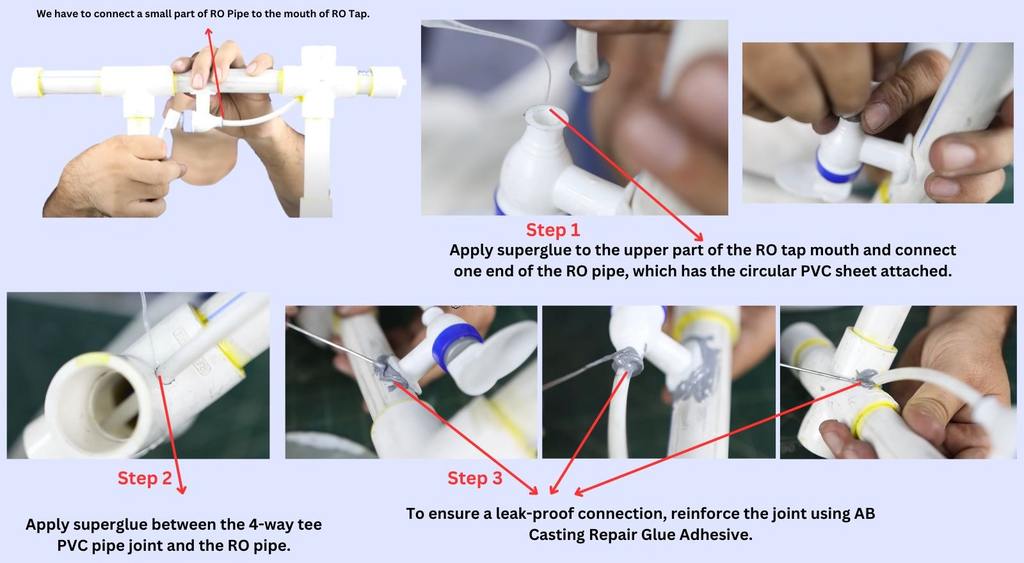
We need to make a hole at this point in the 4-way tee PVC pipe joint so that we can route the RO pipe from inside it. The RO pipe will then come out from the mouth of our water gun and expel the water with high pressure.
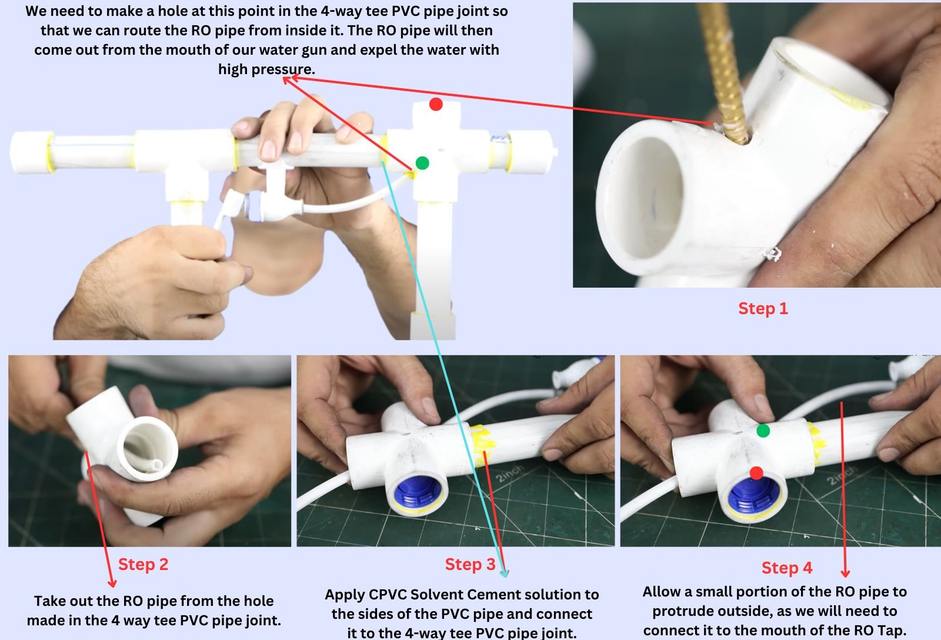
Now, we have to seal the trigger of our water gun by inserting the RO pipe in the hole. For this, cut a circle from the PVC pipe sheet. This will cover the open end of the mouth of the RO tap (which we will use to trigger the gun).
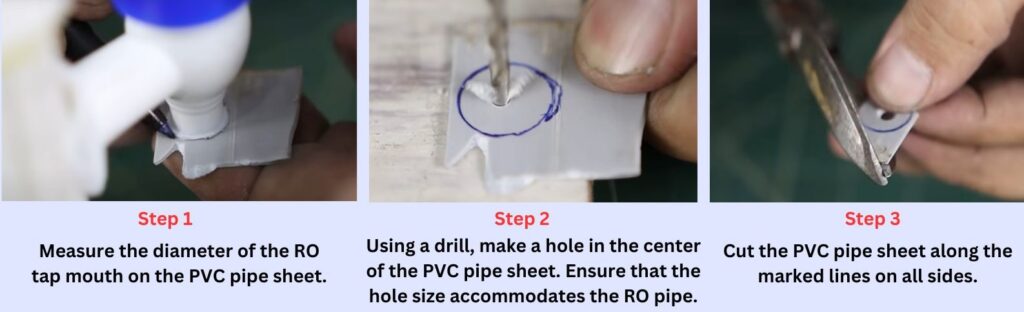
Using a drill or a small pointed object, make a small hole in the centre of the circular PVC sheet. Apply solvent cement on the edge of the circle and the open end of the mouth of the RO tap. Now, press the circle firmly on the mouth of the RO tap to form a seal.
7.) The final part of our water gun
It’s time to attach the 3-inch long PVC pipe piece that we cut to the front of our water gun.
Step1:- Pass this piece of PVC pipe through the RO pipe coming out of the 4-way tee PVC pipe joint.
We need to connect the PVC pipe piece to one part of the 4-way tee PVC pipe joint. To do this, apply CPVC Solvent Cement solution to the upper part of the pipe piece and connect it to the PVC pipe joint.
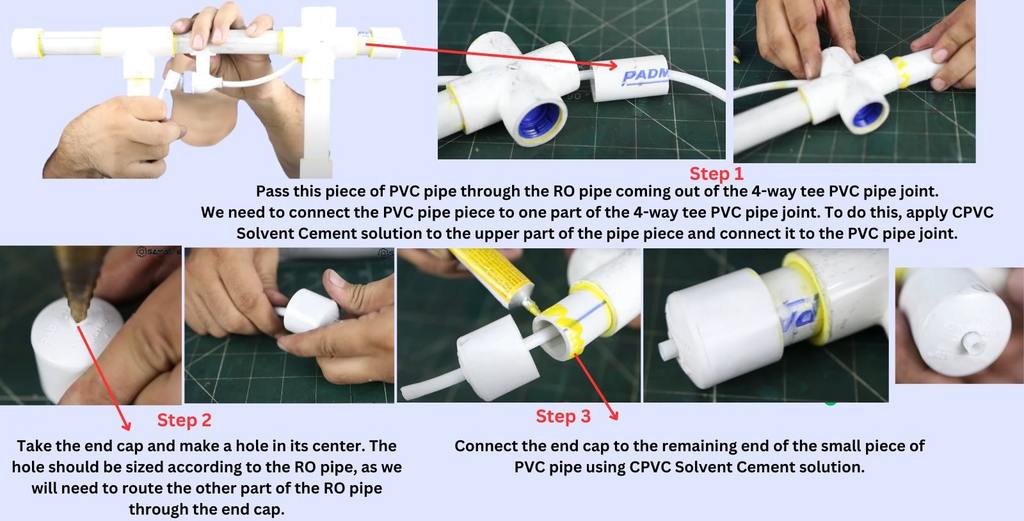
Step2:- Take the end cap and make a hole in its center. The hole should be sized according to the RO pipe, as we will need to route the other part of the RO pipe through the end cap.
Step3:- Feed the RO pipe through the pipe joint and the 3-inch long PVC pipe, then pass it through the hole in the end cap. Connect the end cap to the remaining end of the small piece of PVC pipe using CPVC Solvent Cement solution.
Make a hole in the bottle cap that is fitted in the 4-way tee PVC pipe joint. This will allow the pressurized water from the bottle to flow out through the water gun.
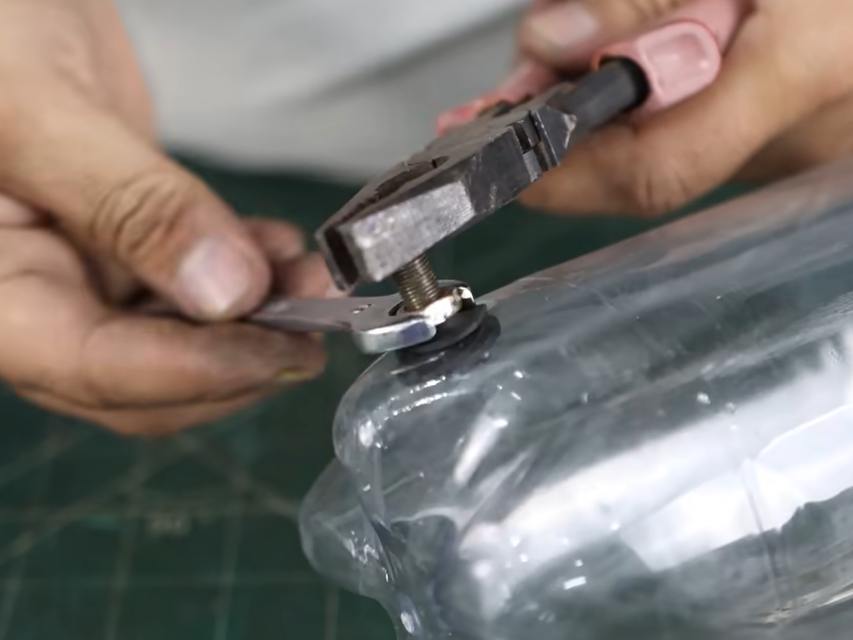
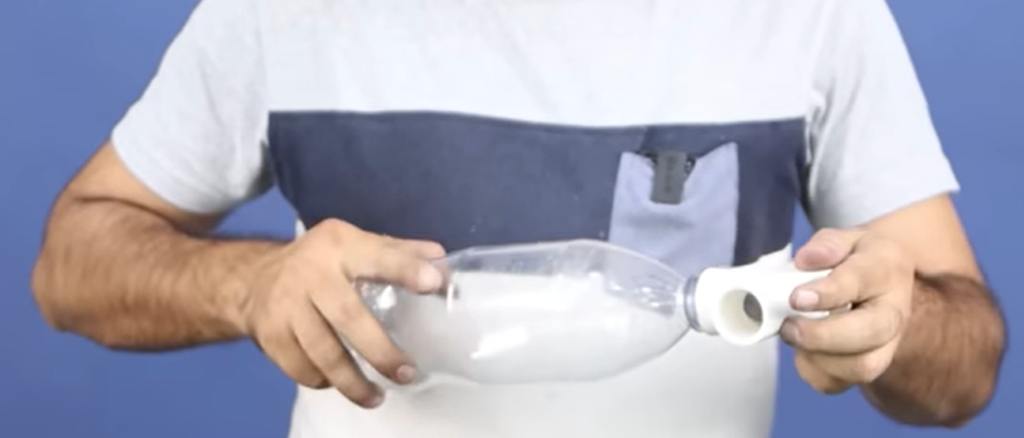
To prepare the water tank for your water gun, you need to attach the Bicycle Rubber Tube Valve to the side of the Coke bottle. You can make the seal more secure by using AB Casting Repair Glue Adhesive.
Fill the Coke bottle with water, but keep in mind that you should leave some space in the bottle for air.
Now, use a bicycle air pump to fill the tube valve with air. This will create air pressure inside the Coke bottle filled with water. When you pull the trigger of the water gun, the pressurized water will be expelled with high force.
Your water gun is now ready. You can increase the water gun’s pressure using an empty pen refill.
If you want to increase the pressure, you can insert the pen refill to the RO pipe coming out of the water gun.
Conclusion
So that was all about making a high-pressure water gun at home using some basic objects. Following the steps outlined in this blog, you can make a powerful water blaster that’s perfect for everything from summer water fights to cleaning outdoor surfaces.
This shows how everyday materials can be repurposed into something impressive and functional. Beyond the enjoyment of using your new water gun, you will also gain valuable skills in DIY crafting and basic engineering. Now, you can enjoy your creativity and have fun with your friends and family.


