

Hello, fellow Halloween lovers! As the air gets crisp and the spooky season approaches, it’s time to get creative with everyone’s favorite autumn canvas: the pumpkin!
If you’re looking for a fun and less messy alternative to carving, you’ve come to the right place.
Today, I’m sharing three of my favorite no carve pumpkin painting ideas that are perfect for artists of all ages.
From beloved animated characters to cute and spooky patterns, these designs are a wonderful way to express your creativity and add a unique touch to your Halloween decor.
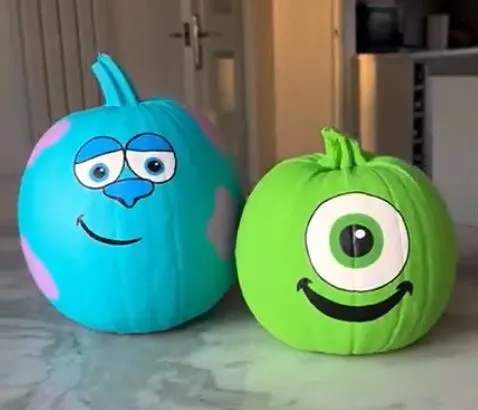
1. Monsters, Inc. Character Pumpkins
Bring your favorite Pixar pals to life with these adorable Mike Wazowski and Sulley inspired pumpkins. This is a fantastic project for movie lovers and a great way to add a pop of bright, friendly color to your Halloween display.
What You’ll Need:
- Two round pumpkins
- Acrylic paints: bright green, light blue, white, black, and a touch of purple
- Paintbrushes of various sizes
- A pencil for sketching (optional)
Step-by-Step Instructions:
Base Coats: Start by giving one pumpkin a solid coat of bright green paint for Mike and the other a coat of light blue for Sulley. You may need two coats for full coverage.
Paint the Details:
- For Mike: Paint a large white circle for his eye, then add a smaller green circle for the iris and a black dot for the pupil. Finish with a big, cheerful black smile.
- For Sulley: Paint two white circles for his eyes and add the pupils. Use your purple paint to add his signature spots, and paint on his friendly, goofy grin.
Outline for Pop: Once the paint is dry, you can use a black paint pen to outline the eyes and mouths to make the features really stand out. These two will look monstrously cute sitting on your porch!
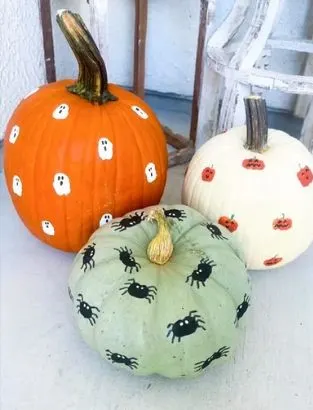
2. Spooky & Sweet Patterned Pumpkins
This idea is perfect for those who love a more classic Halloween vibe but still want to skip the carving. With just a few simple techniques, you can create a whole patch of uniquely patterned pumpkins.
What You’ll Need:
- Pumpkins of various shapes and colors (orange, white, and green look great!)
- Acrylic paint or paint pens in contrasting colors (e.g., white paint on an orange pumpkin, black on a green one)
- A fine-tipped black marker
Step-by-Step Instructions:
Ghostly Polka Dots: On an orange pumpkin, use your finger or a round sponge brush to create simple white polka dots. Once the white paint is dry, use your black marker to draw two tiny eyes and a mouth on each dot, turning them into a swarm of adorable little ghosts!
Creepy Crawly Spiders: On a green or white pumpkin, create black polka dots. Once dry, use your marker to draw eight little legs coming out from each dot, transforming them into spooky spiders.
Jack-o’-Lantern Faces: On a white pumpkin, use your finger to create orange smudges or dots. Let them dry, then use a black marker to draw classic jack-o’-lantern faces on each one. It’s a whole pumpkin patch on a pumpkin!
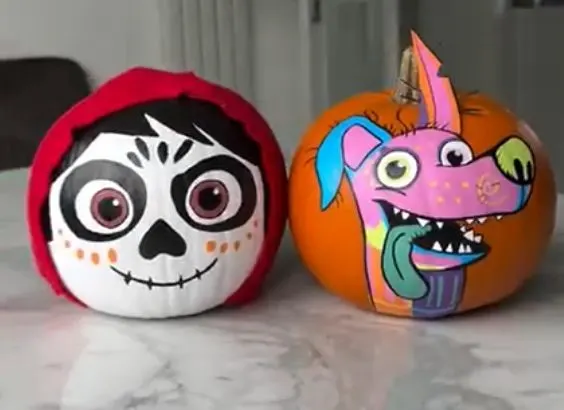
3. “Coco” Inspired Sugar Skull Pumpkins
Celebrate the vibrant and beautiful artistry of Día de los Muertos with pumpkins inspired by the beloved movie Coco. These designs are incredibly detailed and make for a stunning, heartfelt display.
What You’ll Need:
- Pumpkins (white pumpkins work best as a base for Miguel)
- Acrylic paints or paint pens in a variety of bright colors, plus black and white
- A pencil for sketching the design
- Optional: Red fabric for Miguel’s hoodie
Step-by-Step Instructions:
Sketch Your Design: Whether you’re painting Miguel’s sugar skull face or the colorful alebrije, Dante, it helps to lightly sketch your design onto the pumpkin with a pencil first.
Apply Your Base Colors: For Miguel, start with a white base. For Dante, you can leave the natural orange of the pumpkin as your base. Begin blocking in the main colors of your design.
Add the Intricate Details: This is where the magic happens! Use your fine-tipped paint pens to add the beautiful, intricate details. For Miguel, this includes the decorative patterns around his eyes and the stitches on his mouth. For Dante, have fun with the vibrant, layered colors and bold black outlines.
Finishing Touches: To complete the Miguel pumpkin, you can even drape a piece of red fabric around the top to look like his signature hoodie. These pumpkins are a beautiful tribute to a wonderful story.
I hope these ideas spark your creativity and encourage you to pick up a paintbrush this Halloween. Happy painting
3 Spooktacular and Creative Pumpkin Carving Ideas for Halloween
3 Whimsical Autumn Leaf Crafts to Make with Kids
3 Fun and Easy Fall Tree Crafts for Kids (with Free Printable!)
Explore the Parts of an Apple with This Fun Felt Craft (Free Printable!)
A Fun and Personalized Apple Name Craft for Kids
3 Fun and Easy Apple-Themed Activities for Kids (with Free Printables!)
Capture the Beauty of Autumn with These DIY Clay Leaf Bowls
Create a Colorful Paper Turkey for Thanksgiving!
Build Your Own Amazing Dancing Robot!


