

Junk journaling is more than just scrapbooking; it’s an art form dedicated to capturing memories and aesthetics using the overlooked ephemera of everyday life.
If you’re looking for distinct styles to inject into your journal, we’ve analyzed five stunning layouts that demonstrate how to transform receipts, packaging, and forgotten images into cohesive, meaningful pages.
Here are five brilliant concepts for your next junk journal project, complete with step by step insights into how each visual masterpiece is constructed.
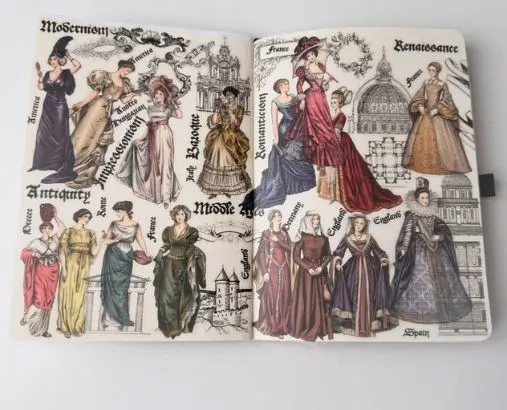
1. The Historical Lookbook: A Celebration of Eras
This style offers a beautiful, educational, and dramatically vintage aesthetic, ideal for lovers of history, costume, and classical architecture.
How to Achieve This Look:
Select the Base Theme: Choose a unifying historical theme, such as fashion over time or architectural evolution.
The spreads we observe feature distinct eras labeled clearly (Antiquity, Middle Ages, Renaissance, Modernity).
Establish the Visual Anchor: Use large, full body images or highly detailed stickers of figures in period dress. Place them prominently on the page.
The key to this layout is allowing the detailed figures to overlap slightly for depth.
Incorporate Architectural Elements: Fill the negative space with sketch style drawings or blueprint cutouts of historically relevant buildings (like the Renaissance dome or medieval castle). This creates visual context and anchors the figures in their time period.
Layer Text and Labels: Use elegant, antique style fonts to label the specific eras and countries featured (e.g., Rome, France, Spain, Baroque, Impressionism).
Final Touches: Maintain a consistent color palette sepia tones, rich jewel tones, and aged paper textures work best to enhance the historical feel.
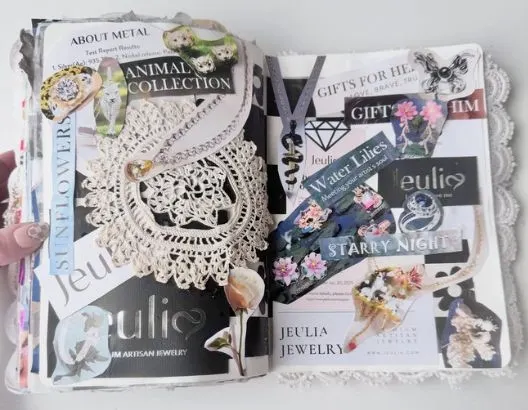
2. The High Contrast Product Showcase: Jewelry and Lace
This spread is highly tactile and dramatic, relying on a sharp contrast between black print, white paper, and opulent metallic elements.
It’s perfect for highlighting advertisements or small, treasured objects.
How to Achieve This Look:
Build a Monochromatic Foundation: Begin with cutouts and packaging from high end retail or jewelry brands. The use of black and white text and graphics provides a sophisticated base.
Introduce Texture with Lace: The central, defining feature of this layout is a large piece of lace, perhaps a paper doily or a cut piece of actual fabric. The textured material immediately elevates the simple paper elements beneath it.
Focus on Ad Imagery: Cut out specific, appealing images from product catalogs, such as close ups of jewelry or high contrast artistic prints (like the “Starry Night” detail).
Layer these snippets over the lace, ensuring important keywords (like “Jeulia” or “Animal Collection”) are highly visible.
Add Strategic Accents: Incorporate small details that break the monochrome a splash of color from a flower cutout or a piece of golden ribbon.
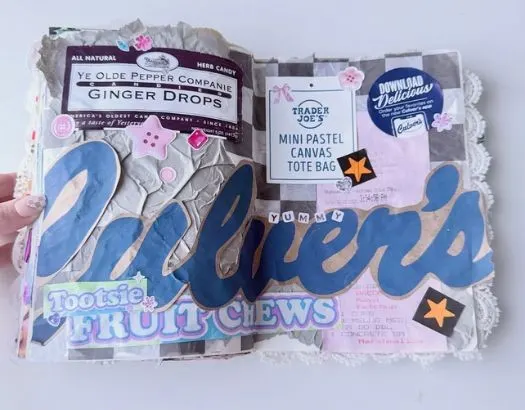
3. The Receipt and Wrapper Memory Vault: The Dining Experience
This vibrant and playful approach focuses on preserving the immediate experience of a favorite meal or snack, combining functional receipts with colorful wrappers.
How to Achieve This Look:
Gather the Edible Ephemera: Collect a variety of wrappers, bags, and packaging associated with the memory (e.g., candy wrappers, crinkled paper bags).
Create Dimensional Backgrounds: Use crumpled or crinkled wrapping paper (like the wax paper liner from food service) as a textural background layer. This gives the page immediate depth and an authentic “found object” feel.
Make the Branding Central: Cut out large, striking lettering from packaging (like the massive blue “Culver’s” text). Layer this text using thick cardstock or layered cutouts to give it a 3D effect that dominates the spread.
Integrate the Data: Glue down the actual receipts and small paper labels (like the Trader Joe’s sticker), allowing them to overlap the colorful junk elements. These pieces serve as the date and time stamp of the memory.
Embellish with Whimsy: Add small, unrelated decorative items like colorful paper buttons or die cut stars to fill small gaps and enhance the playful mood.
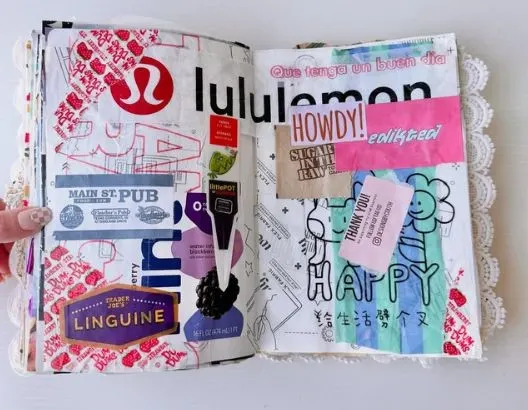
4. The Branded Bag Collage: Retail and Bold Shapes
This spread is highly graphic, using large segments of retail packaging to build a visually dense and energetic structure. It’s an excellent way to use up those distinctive shopping bags.
How to Achieve This Look:
Start with Large Brand Cuts: Take recognizable, boldly branded shopping bags (like Lululemon) and cut them into geometric sections.
Use these large pieces to frame the top and bottom of the pages, acting as the primary background texture.
Layer Distinctive Labels: Incorporate smaller, specific product labels that contrast sharply with the background (e.g., the bright red Trader Joe’s Linguine label).
The contrast between the minimalist athletic brand and the food label creates visual intrigue.
Maximize Color Contrast: Utilize materials that feature high contrast white on red, white on black to maintain a punchy, modern feel.
Mix Languages and Textures: Overlay bold, hand written style text or snippets of positive phrases (“Que tenga un buen dia,” “HAPPY”) over the retail logos.
Add Repeated Motifs: Use small, identical stickers or cutouts (like the tiny red strawberries scattered around the edges) to tie the disparate elements of the collage together.
5. The Travel Ephemera Spread: Documentation and Destination
This neat, document heavy layout is the quintessential method for memory keeping, focusing on tickets, receipts, and confirmations from a trip or a single day out.
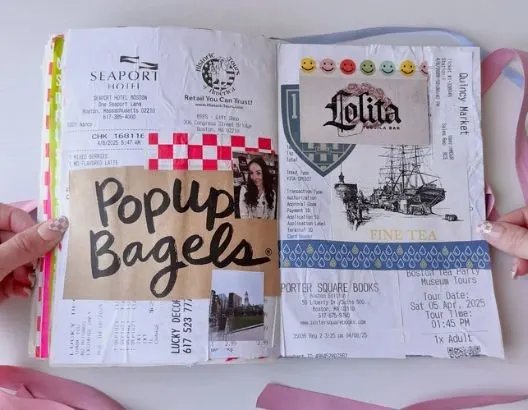
How to Achieve This Look:
Gather the Evidence: Collect all transactional documents from an outing: hotel receipts, restaurant checks, bookstore invoices, and museum tickets.
Establish Primary Blocks: Glue down the largest documents (like the hotel bill and the bookstore receipt) first, treating them as foundational blocks for the design. Layer these vertically and horizontally.
Highlight the Experience: Integrate memorable items, such as the ticket stub for a specific tour or a business card from a unique location (like the Lolita Tequila Bar logo).
Use Washi Tape for Cohesion: Introduce a patterned element, such as a repeating geometric washi tape, to bridge the gap between unrelated documents and add a clean line of color across the page.
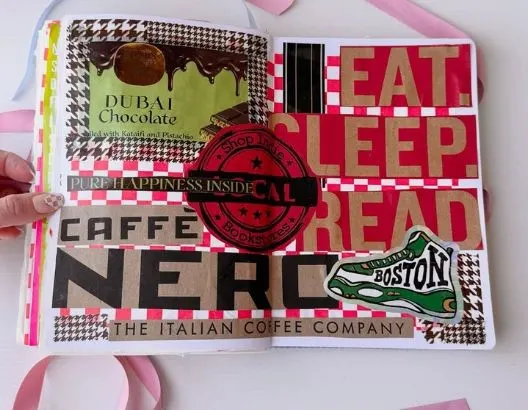
6. The High Impact Typography Spread
This method focuses on using bold, block lettering and contrasting patterns to create a visually aggressive and unforgettable introduction to a section or trip.
Step by Step Implementation:
Select Your Patterns: Choose two dramatically different background patterns. In the journal we observed, a classic red and black houndstooth was paired with solid fields and high contrast geometric shapes, instantly defining the mood.
Create Bold Word Art: Cut large, block letters (or use die cuts) from contrasting cardstock (tan, white, or black works best) to form a central phrase, such as “EAT SLEEP READ.”
Layer these letters heavily over the background patterns so they become the dominant feature.
Integrate Focal Points: Place one or two highly symbolic items. Here, a “Caffe Nero” logo and a sticker for a local landmark (the Boston sneaker) anchor the spread geographically, while a food item (the Dubai Chocolate wrapper) adds flavor.
Add Stamps and Seals: Use rubber stamps or circular seals (like the “Shop Indie Bookstores” seal shown) to break up the hard lines of the block text and provide a touch of authenticity and texture.
Finalize with Contrast: Use a small amount of solid colored tape (like the vertical black strip) to provide visual rest and separate the busy elements, ensuring the text remains legible.
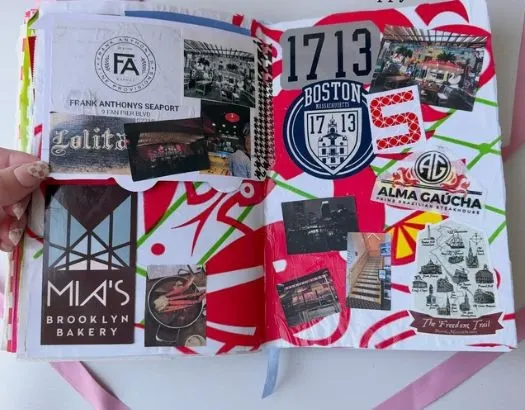
7. Culinary Map and Memento Layout
When exploring a new city, the food spots often become the primary landmarks. This technique turns receipts, menus, and small venue photos into a unified map of your culinary journey.
Step by Step Implementation:
Establish a Dynamic Background: Start with a large, vibrant, and repetitive background pattern (such as the red and white abstract design observed). This pattern acts as the glue that holds diverse items together.
Block and Structure: Organize your mementos (restaurant logos, receipts, small interior photos) into clean, distinct blocks.
We noticed that keeping the logo items mostly rectangular (like the Frank Anthony’s and MLA’s logos) creates a tidy, architectural feel.
Layer Small Details: Use very small, cropped photos perhaps just a dish or a specific piece of architecture and layer them slightly over the main logo or receipt to provide context without clutter.
Highlight Local Flair: Dedicate a prominent spot for a local emblem or patch (like the “Boston 1713” insignia). This instantly grounds the culinary journey in a specific locale.
Include Found Maps: If available, cut out a small map or illustration showing the location of the restaurants (like the miniature Freedom Trail map included), demonstrating the extent of your exploration.
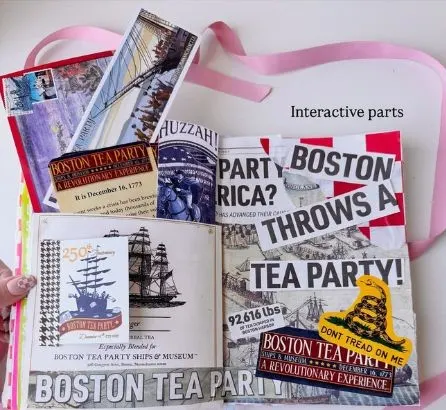
8. The Layered History Flap Design
For documentation that involves historical narratives or detailed personal stories, incorporating interactive layers is essential. This method invites the reader to engage physically with the journal.
Step by Step Implementation:
Choose a Narrative Focus: Select a specific event or location rich with ephemera (like the Boston Tea Party). Use vintage or sepia toned papers for the base layer to establish a historical feel.
Build the Foundation: Print or paste key illustrations and foundational text onto the page. Notice how the large Boston Tea Party text anchors the bottom of the spread.
Design the Interactive Flap: Create a primary flap that covers the central part of one page.
This flap can be lifted to reveal hidden text, photos, or more detailed information underneath. Use engaging, headline style text on the exterior of the flap.
Utilize Ephemera Pockets: Layer actual tickets, commemorative postcards, or informational cards (like the “Revolutionary Experience” ticket) on the page.
These can be glued only at the edges to form small pockets or hinge points.
Add Symbolic Details: Include historically relevant motifs or stickers, such as the “Don’t Tread on Me” flag shown, to enhance the theme and provide visual flair.
9. The Bold Travel Title Spread
Sometimes, the simplest approach delivers the greatest impact. This technique maximizes visibility using massive, contrasting word cutouts against a visually busy backdrop.
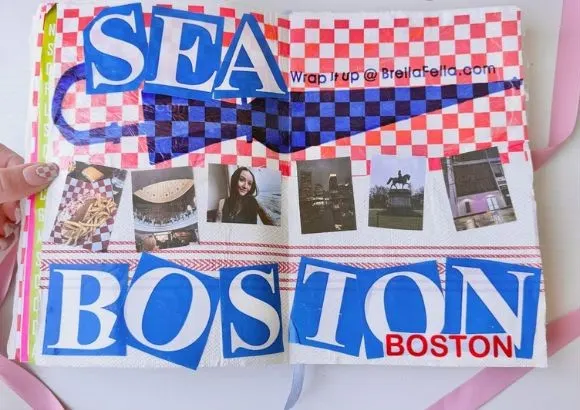
Step by Step Implementation:
Set a Busy Stage: Choose a checkerboard or repetitive, high energy pattern for the background.
This spread utilizes a red, white, and blue checkered pattern, providing a patriotic and energetic foundation.
Create Over Sized Lettering: Cut out the destination or key phrase (“SEA BOSTON”) in the largest size possible, using a solid, contrasting color (bright blue works well against red checks). The letters should span the entire height of the page.
Position Key Photos: Arrange a small collection of focused, impactful photographs between the large lettering.
These photos should capture the essence of the trip a landmark, an outfit, or a memorable sight. Keeping them small ensures they don’t compete with the massive typography.
Maintain Color Cohesion: Stick strictly to the chosen color palette (red, white, and blue in this instance).
This discipline ensures that despite the busy background, the layout feels intentional and cohesive.
Final Touches: Use small, reinforcing stickers or mini labels (like the small red “BOSTON” at the bottom right) to solidify the theme and add a final pop of contrast.
10. Maximalist Ephemera and Brand Collage
This method celebrates retail therapy and found packaging, embracing a maximalist style where ‘more is more.’
It’s the perfect technique for documenting a dedicated shopping trip or a detailed inventory of favorite things.
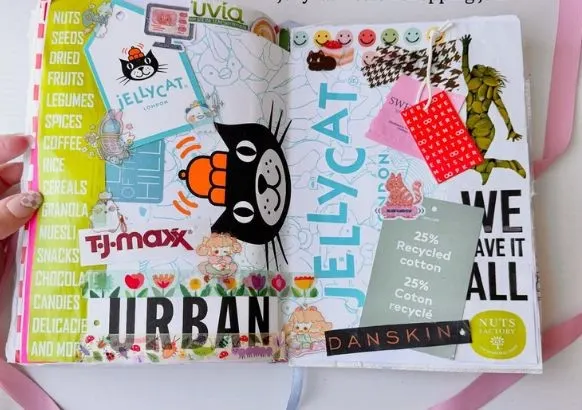
Step by Step Implementation:
Gather the Junk: Collect every piece of interesting retail ephemera: price tags, brand stickers, recycling labels (e.g., “25% Recycled Cotton”), nutritional labels, and product packaging.
Anchor with Large Logos: Use the most important brand logos (like the huge Jellycat face and the “TJ Maxx” logo) as the structural anchors for the spread.
Create Inventory Blocks: Use lists or cutout blocks of text (like the “NUTS SEEDS DRIED FRUITS” list) to represent general categories of goods purchased, giving context to the surrounding stickers.
Overlap and Layer: Glue elements directly on top of one another. The goal is to eliminate white space.
Let stickers spill over tags and logos overlap background prints. The visual density tells the story of an overflowing shopping bag.
Inject Personality: Add whimsical stickers or unexpected elements (like the pin up graphic observed) that reflect the specific mood or items purchased during the haul, injecting your unique personal style into the clutter.
11. The Neon Travel Spread: Documenting Ephemera with Pop
The Idea: Transforming functional receipts and museum tickets into bold, energetic documentation pages by using high contrast color backgrounds.
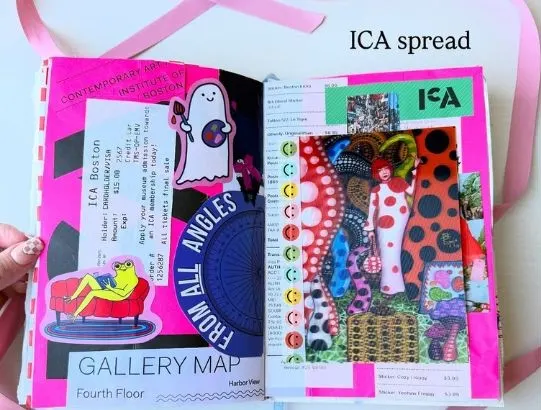
How You Can Achieve This Look:
Choose Your Anchor. Start with the core piece of your memory in this case, a museum ticket or a receipt from your trip (like the Contemporary Art Institute of Boston ticket seen here). Center this physical item on your page.
Embrace Electric Colors. Frame your page with a startlingly bright color, like neon pink or electric yellow.
This creates instant visual drama and makes mundane white paper scraps pop off the page.
Integrate Fun Flips and Tabs. Notice how the ICA spread includes elements that lift up (referenced as “flippies”).
Use thin paper scraps or small decorative tabs to attach elements, allowing you to hide journaling underneath the documented receipt or ticket.
Use Theme Stickers. Add relevant stickers that match the atmosphere of your visit a whimsical ghost or a fun frog sticker adds personality and breaks up the straight lines of the tickets.
12. The Destination Deep Dive: Layering Memories with Maps
The Idea: Dedicating a two-page spread to a specific destination, focusing on layered travel ephemera and historical mapping details.
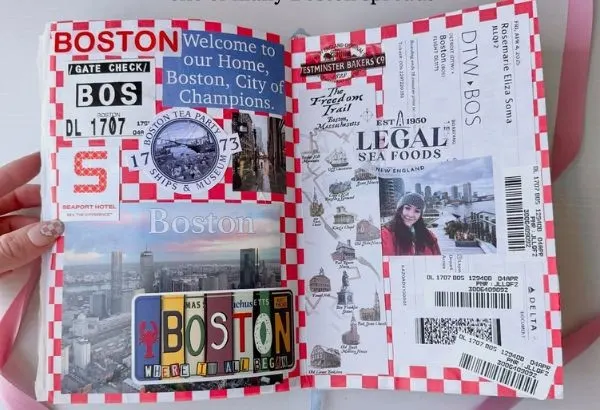
How You Can Achieve This Look:
Set the Foundation. For a cohesive look, choose a foundational background pattern. The red and white checkerboard seen in the Boston spread is bold and instantly connects multiple elements.
Utilize Official Documents. Your actual flight boarding passes or gate checks are invaluable.
They offer structure and authentic typography. Layer these diagonally or along the borders to frame the scene.
Incorporate Maps and Historical Context. Instead of just using photos, include a diagram or sketch of a major local landmark, such as the map of the Freedom Trail. This adds depth and historical texture to your travel narrative.
Create a Photo Focal Point. Place a personal photo, perhaps showing the cityscape or a significant view, slightly off-center to act as the main focal point, ensuring it overlaps some of the map elements.
13. The Calming Consumption Spread: Using Packaging as Botanical Art
The Idea: Elevating beautiful product packaging from everyday consumption into a sophisticated, cohesive, and tranquil journal page.
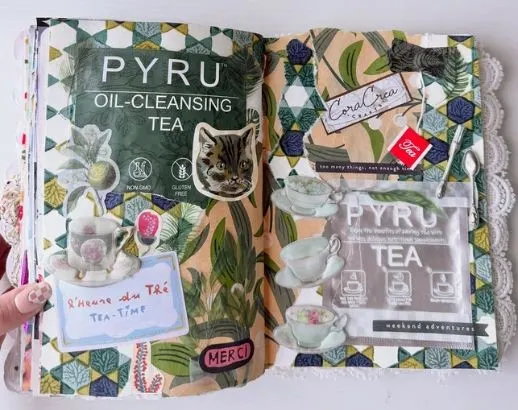
How You Can Achieve This Look:
Focus on a Specific Product Line. When you find a product with beautiful design (like the “Pyru” tea packaging), use its wrappers and boxes as the primary source material. Flatten the boxes and cut out the most appealing illustrations.
Create a Botanical Base. If the packaging features illustrations (like botanicals or leaves), use large cutouts to create a continuous, pattern rich background that extends across both pages.
Integrate Found Items. Use actual remnants of the product such as an empty tea bag wrapper or a decorative miniature spoon and adhere them using clear packaging film or a tiny envelope pocket.
Add Soft Textures. To contrast the stiffness of the packaging, trim the outer edges of your journal page with delicate lace or crochet trim. This adds an instantly cozy and soft touch to your spread.
14. The Maximum Layering Technique: Embracing Abstract Junk
The Idea: Creating a textural, visually dense spread by overlapping high contrast packaging elements and abstract graphics, proving that busy can be beautiful.
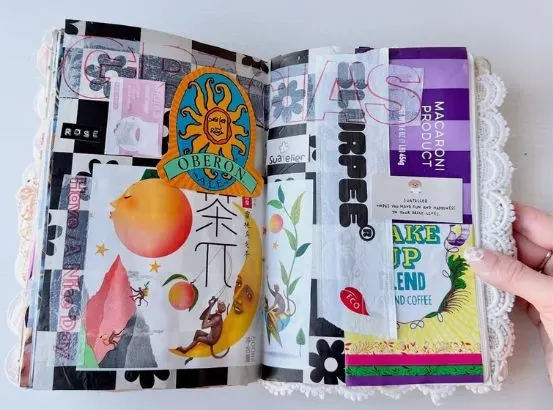
How You Can Achieve This Look:
Choose High Contrast. Select papers that feature striking black and white patterns and bold, recognizable corporate logos (like the “Slurpee” text or Macaroni packaging).
Build the Base Layer Densely. Begin by gluing down the largest, most abstract pieces (such as the black and white flower patterns). Ensure there is very little white space remaining.
Introduce Narrative Imagery. Layer in highly detailed, standalone cutouts like the image of fruit or the sun and moon motif. These small, visually rich images act as anchors amid the surrounding chaos.
Vary Opacity. Use sheer materials, like rice paper or thin packing tissue, over some of the bolder graphics. This softens the lines between layers and gives the page a more complex, aged feel.
15. The Thematic Visual Feast: Pop Art Collage with Sticker Kits
The Idea: Dedicated pages showcasing themed visual collections, utilizing kits and hyper realistic cutouts to create a bright, inviting “box of knots foodie pack.”
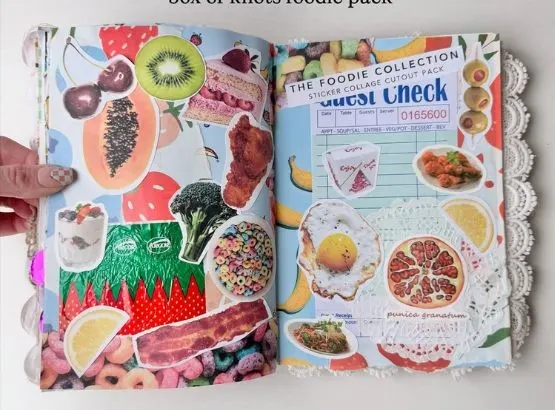
How You Can Achieve This Look:
Start with a Bold, Solid Background. Unlike the abstract spread, this technique works best when the background is a unified, bright color (like the pastel blue/teal seen here). This allows the detailed elements to truly pop.
Collect Hyper Realistic Images. Whether you use pre packaged sticker kits or cut out photos from magazines, focus on images with incredible detail and texture, like slices of kiwi, bacon, or fried chicken.
Scatter and Fill. Instead of layering items one on top of the other, scatter the themed images across the page like ingredients.
Allow some pieces to slightly overlap the edge to make the arrangement feel abundant.
Include a Structural Element. Introduce a piece of authentic paper ephemera related to the theme, such as a printed vintage “Guest Check” receipt.
This small detail provides a sense of order and nostalgia amidst the visual abundance.
10 Interactive Junk Journal Ideas to Bring Your Pages to Life
10 Inspiring Junk Journal Spreads to Try Today
Create a Spooktacular Light Up Halloween Card: A Step by Step Guide
How to Craft a Stunning Autumn Leaf Bowl
A Spooktacular DIY Jack Skellington Lantern
Fun & Easy Halloween DIYs Glowing Jar & Bat Candle
2 Spooky & Easy DIY Glowing Jars for Halloween
5 Creative No Carve Pumpkin Painting Ideas for a Spooktacular Halloween!
3 Spooktacular and Creative Pumpkin Carving Ideas for Halloween


