
The magic of junk journaling is its power to turn the mundane into the meaningful. It’s a creative playground where ticket stubs, old receipts, and forgotten photos become the building blocks of a beautiful, personal time capsule.
But even the most seasoned journaler can face a creative block.
If you’re staring at a blank page and looking for a spark of inspiration, you’ve come to the right place.
Here are five fun and unique junk journal ideas to get your creative gears turning and help you fill those pages with memories and art.
Idea 1: The “Photo a Day” Calendar
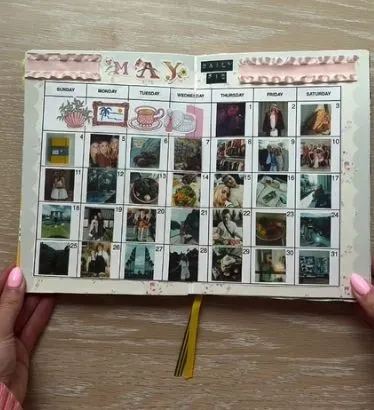
This is a wonderful way to create a visual diary of your month. Instead of writing long entries, you capture a single moment from each day with a photo, creating a beautiful mosaic of memories by the end.
What You’ll Need:
- A two page spread in your journal
- A calendar template or a ruler and pen to draw your own
- A portable mini photo printer (like a Canon Ivy or HP Sprocket)
- Scissors and a glue stick or tape runner
- Stickers and washi tape for decoration
Step by Step Instructions:
Set Up Your Calendar: Dedicate a two page spread to a single month. Either paste in a printed calendar template or draw a grid with boxes for each day.
Decorate the Page: Before you start adding photos, decorate your spread! Add the month’s name at the top, use washi tape to create borders, and place a few decorative stickers around the grid.
Capture Your Day: Each day, take one photo that represents your day it could be your morning coffee, a pet, a pretty view, or a selfie with friends.
Print and Place: Use your portable printer to print a small, sticker backed photo. Trim it if necessary and place it in the corresponding box on your calendar.
Watch It Grow: Continue this process every day. By the end of the month, you’ll have a gorgeous, at a glance summary of your experiences.
Idea 2: The Receipt Collage
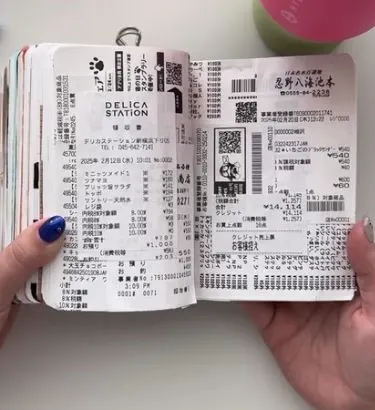
Don’t throw away those ridiculously long receipts! They make for a surprisingly cool and textured background that tells a story of its own, whether it’s a big grocery haul or a craft store splurge.
What You’ll Need:
- Long receipts or paper lists
- A glue stick
- Scissors
- A binder clip (to hold other pages back)
Step by Step Instructions:
Choose Your Receipt: Pick a receipt that has an interesting length or text.
Apply Glue: Coat the back of the receipt thoroughly with a glue stick.
Create Your Layout: You can either glue the receipt down in a single column or cut it into sections to fill the entire page. For a fun effect, let the receipt run across the entire two page spread.
Press and Trim: Smooth the receipt onto the page, pushing out any air bubbles. If any part of the receipt hangs over the edge, you can either fold it over or neatly trim it with scissors for a clean edge. Now you have a unique background ready for photos, stickers, or journaling.
Idea 3: DIY Translucent Word Art
This clever hack lets you lift words and phrases directly from magazines to create your own custom, semi transparent stickers. It’s perfect for adding titles and quotes with a rustic, layered look.
What You’ll Need:
- Frosted matte tape (like Scotch Magic Tape)
- Magazines, old books, or flyers
- A burnishing tool (a bone folder, the back of a spoon, or even a credit card)
- Scissors
Step-by-Step Instructions:
Find Your Words: Hunt through magazines for words or short phrases in fonts and colors you like.
Tape and Burnish: Place a piece of frosted tape firmly over your chosen word. Using your burnishing tool, rub vigorously over the tape. This transfers the ink from the paper to the tape’s adhesive.
Lift the Ink: Carefully peel the tape off the magazine page. The ink should now be stuck to the tape.
Create Your Sticker: You now have a custom, translucent sticker! Trim the excess tape around the word and stick it directly onto your journal page for a cool, layered effect.
Idea 4: The Interactive Birthday Page
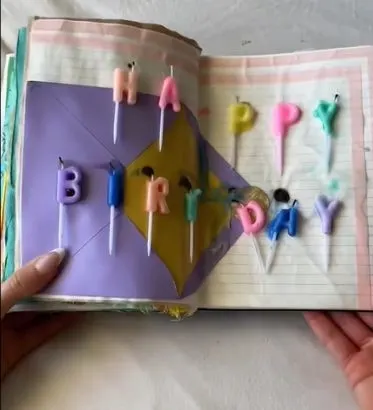
Create a birthday spread that’s more than just a memory it’s an experience! This idea uses real birthday candles to make a page that’s playful, interactive, and beautifully imperfect.
What You’ll Need:
- An envelope
- Letter shaped birthday candles (e.g., spelling “Happy Birthday”)
- Tissue paper or other decorative paper for a background
- A glue stick
- A lighter
Step by Step Instructions:
Create a Base: Glue down some tissue paper to add color and texture to your page.
Add a Pocket: Glue the envelope onto the page to create a pocket for cards or other mementos.
Place the Candles: Arrange the “Happy Birthday” candles across your spread. Gently push the sharp ends into the paper to hold them in place. Some can go into the envelope for stability.
Make a Wish! A word of caution: Be mindful of the flame and have water nearby. Carefully light the candles with a lighter.
Blow Them Out: Let them burn for just a moment before blowing them out. The drips of wax left behind will add an authentic, celebratory texture to your page that you can cherish forever.
Idea 5: The “Sticker Bomb” Pop Up
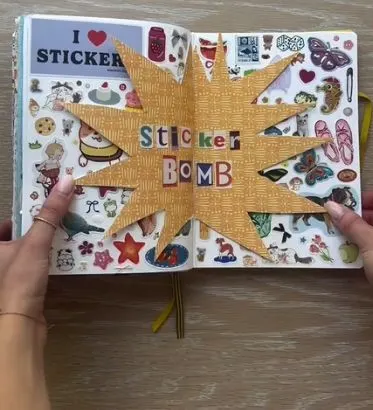
For the sticker lovers out there, this spread is an explosion of fun! It combines a simple pop up element with a chaotic, colorful collage of all your favorite stickers.
What You’ll Need:
- Decorative paper
- A craft knife and scissors
- A variety of stickers (letter stickers and decorative ones)
- A glue stick
Step-by-Step Instructions:
Create the Pop Up: Take a blank page in your journal. With the page folded closed, draw half of a starburst or explosion shape along the center crease.
Cut Carefully: Use a craft knife to cut along the lines you drew, but do not cut the center fold.
Pop It Out: Open the page and push the cut-out shape through to the other side. Fold it along the creases so it “pops” out when the journal is opened. You can glue a piece of decorative paper behind it for contrast.
Add a Title: Use letter stickers to spell out “Sticker Bomb” or another fun phrase on the pop-up element.
Let the Bomb Go Off! Now for the best part: cover the rest of the page (and the page opposite it) with a dense, overlapping collage of your favorite stickers. Don’t worry about perfect placement—the goal is joyful chaos!
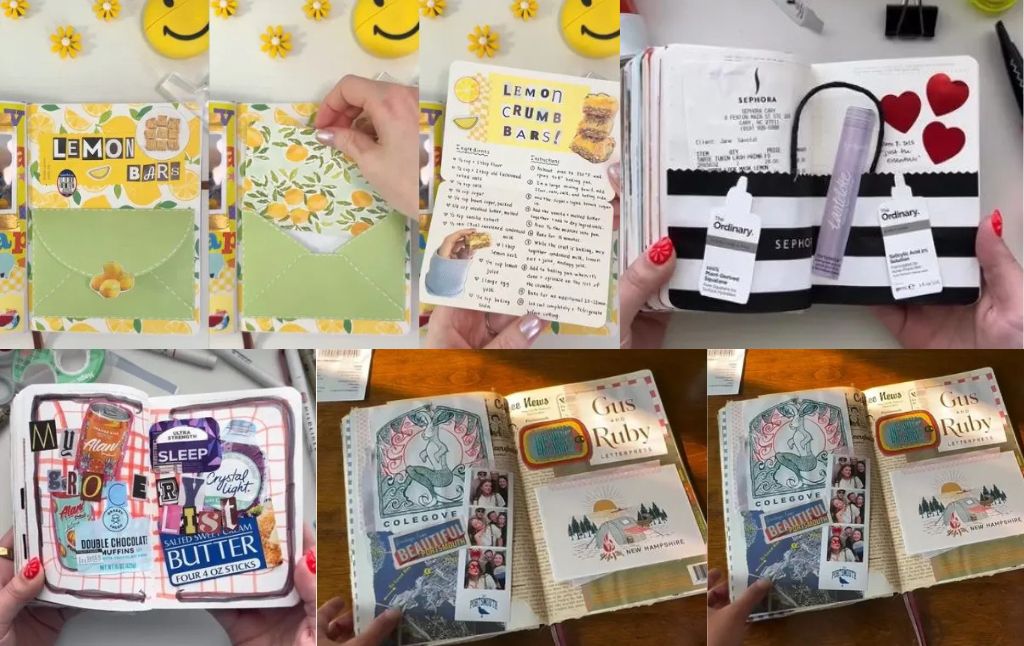
Idea 6: The Everyday Eats Log
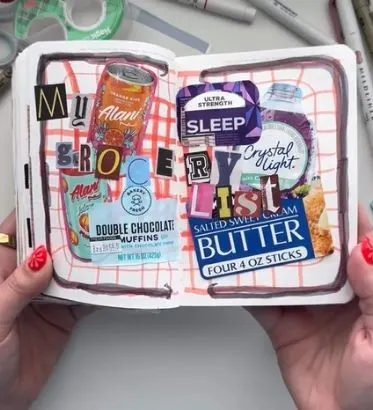
We all have our go-to snacks, favorite drinks, and staple groceries. Why not immortalize them in a fun, vibrant spread? This page is a celebration of the simple, delicious things that fuel your day.
What You’ll Need:
- Food and drink packaging (cardboard boxes from drink mixes, butter, energy drinks, etc.)
- Markers
- Glue stick
- Magazine or junk mail letter cutouts
Step by Step:
Create a Cozy Background: Start by drawing a simple pattern across your two page spread. A hand drawn gingham or plaid pattern in a warm color like red gives off a lovely picnic blanket or tablecloth vibe. Add a darker, rough border to frame your page.
Harvest Your Packaging: Carefully cut out the most interesting parts of your food packaging think bold logos, fun illustrations, and colorful designs. For thicker cardboard, you can often peel away the back layers to make the piece thinner and easier to glue down.
Arrange Your Collage: Lay out your cutouts on the page before committing with glue. Play with the composition, overlapping pieces to create depth and visual interest.
Add a Title: Use letter cutouts from magazines or flyers to spell out a title like “My Grocery List” or “Favorite Things.” The mismatched letters add to the quirky, handmade charm of a junk journal.
Idea 7: The Shopping Trip Memento
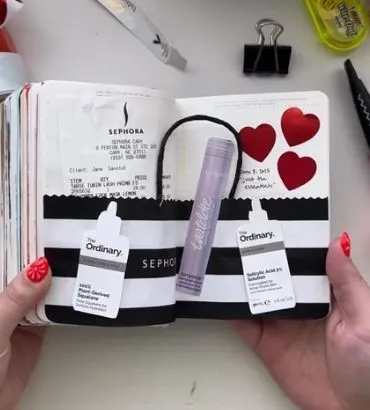
Capture the satisfaction of a great shopping day especially one where you treated yourself! This idea turns a simple shopping bag and product boxes into an interactive and stylish memento.
What You’ll Need:
- A visually interesting paper shopping bag (like Sephora’s iconic black and white stripes)
- Empty product boxes from your purchases
- Your shopping receipt
- Glue, tape, and decorative scissors (optional)
- Stickers
Step by Step:
Deconstruct the Bag: Carefully take apart the shopping bag. Cut a large section of its most recognizable pattern to serve as the main background element for your page. You can use decorative scissors for a fun edge.
Repurpose the Handles: The bag’s handles can be glued down across the top of the spread to create the illusion of a full bag right on your page. Use a strong adhesive like rubber cement for this.
Create a Pocket for Your Receipt: Use a leftover scrap from the bag or a piece of plain paper to create a small pocket. Tuck your folded receipt inside as a hidden memory of the day.
Showcase Your Haul: Cut out the front panels or logos from your product boxes. Arrange them on the page as if they are spilling out of the shopping bag.
Add Final Touches: Embellish the page with stickers that fit the theme, like hearts or stars, to add a pop of color and personality.
Idea 8: The Museum Visit Collage
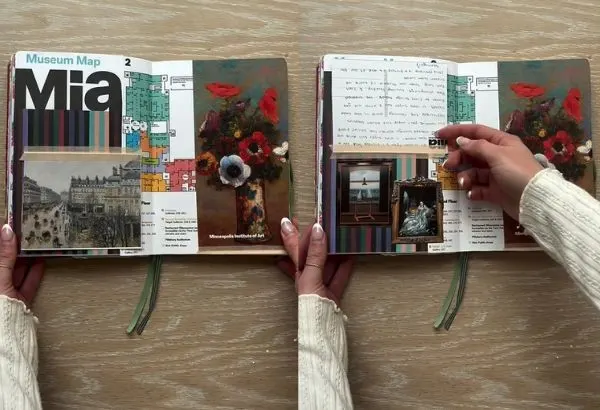
A day spent wandering through art galleries is full of inspiration. This spread is the perfect way to document your favorite pieces and remember the layout of the museum you explored.
What You’ll Need:
- Museum map or brochure
- Postcards from the gift shop
- A portable photo printer (like an HP Sprocket or Canon Ivy) for printing photos of artwork
- Washi tape
- A pen
Step by Step:
Make the Map Interactive: Glue the front cover of the museum map to one side of your spread. Then, fold the rest of the map accordion style so it can be opened and explored within your journal.
Highlight Your Journey: Cut out the floor plan from a second map (or the back of the first one) and paste it onto the opposite page. You can even highlight the rooms you visited.
Feature Your Favorites: Use postcards of key artworks as large visual elements. For other pieces you loved, print out small photos and arrange them around the page.
Add a Flip-Up Surprise: Attach a photo or postcard with washi tape along one edge to create a simple hinge. This allows you to write a hidden note or memory underneath.
Jot Down Your Thoughts: Use a blank postcard or a dedicated space on the page to write down your reflections, favorite artists, or what a particular piece meant to you.
Idea 9: The Layered Travel Log
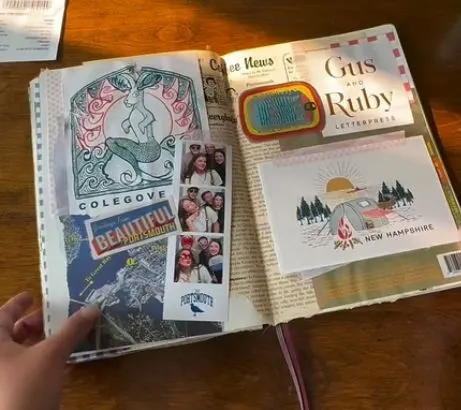
This spread is all about capturing the atmosphere of a trip or a day exploring a new town. By layering different types of paper and memorabilia, you create a rich, textured page that’s as exciting to look at as the trip was to experience.
What You’ll Need:
- A page from a local newspaper or magazine
- Maps, tourist brochures, and postcards
- Receipts, tickets, and photo booth strips
- Stickers and business cards from local spots
- Washi tape and a glue stick
Step by Step:
Start with a Textured Base: Glue a page from a local newspaper down as your background. The text and ads immediately set the scene.
Build Your Layers: Tear, don’t cut, the edges of your maps and brochures for a softer, more organic look. Layer them over the newspaper, letting different elements peek through.
Create Pockets and Tuck Spots: Use paper bags, envelopes, or even just cleverly glued postcards to create pockets. These are perfect for tucking away smaller, more personal items like receipts and tickets.
Add Personal Mementos: A photo booth strip is a fantastic way to include yourself in the memory. Paste it down so it draws the eye.
Fill in with Details: Finish the spread by adding smaller items like stickers from a local gift shop, a business card from a great café, or washi tape that matches the color scheme of your trip.
Idea 10: The Recipe Keeper
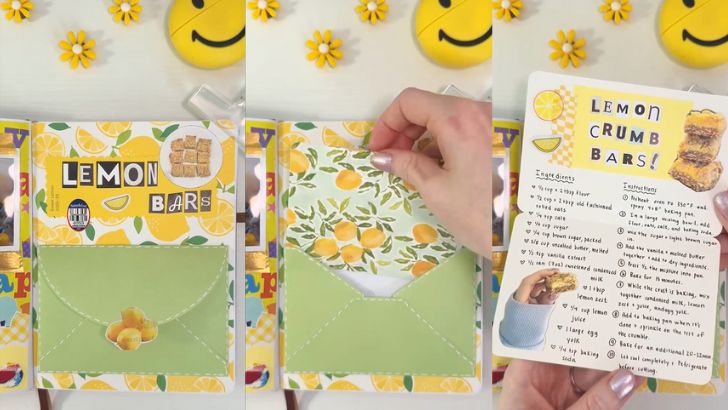
Some recipes are more than just instructions they’re tied to memories, people, and feelings. This beautiful and functional spread gives a beloved recipe the home it deserves.
What You’ll Need:
- Themed scrapbook paper
- A colored envelope
- A paint swatch in a coordinating color
- A recipe card or blank cardstock
- Letter cutouts or stickers
- A fine-tip pen
- Stickers from produce (like a lemon sticker!)
Step by Step:
Set the Theme: Cover your journal page with a patterned paper that matches your recipe like a lemon print for lemon bars!
Add an Envelope Pocket: Glue a colorful envelope flat against the page. This will become a tidy pocket to hold your recipe.
Create a Title: Use a paint swatch as a colorful backing for your title. Spell out the name of the recipe using letter cutouts. This adds a wonderful, graphic element.
Write Out the Recipe: On a separate card that fits into your envelope, neatly write down the ingredients and instructions. Decorate the card with small drawings or stickers. You can even include a photo of the finished dish.
Assemble and Embellish: Tuck the recipe card into the envelope. For a final, charming touch, add a real produce sticker to the page to tie it all together.
So grab your glue stick, gather your treasures, and start telling your story, one page at a time. Happy journaling!
How to Craft Your Own Glowing Ghostface Lamp
How to Make Your Own Glow in the Dark Ghost Window Clings
How to Make Gorgeous Melted Crayon Ornaments
Create Stunning DIY String Lanterns
How to Make a Spooky Halloween Jar Lantern
Seven Pumpkin Creative Painting Ideas for Halloween!
3 Creative No Carve Pumpkin Painting Ideas for Halloween
3 Creative and Unique Pumpkin Carving Ideas for Halloween


