

A Sweet and Simple Craft That’s Perfect for Easter!
Looking for a fun Easter craft that doubles as a sweet treat? These Easter Bunny Lollipops are the perfect blend of creativity and candy — easy enough for young kids to help with and cute enough to brighten any Easter basket!
Whether you’re planning a classroom activity, a party favor, or a fun surprise for your little ones, this easy DIY bunny lollipop will be a hit with kids of all ages. And the best part? You only need a few supplies!
Supplies You’ll Need:
- Lollipops (Tootsie Pops, Blow Pops, or Dum Dums work great)
- White cardstock or construction paper
- Pink paper (or pink marker/crayon)
- Small googly eyes (optional)
- Small pom-poms (for the nose and tail)
- Glue stick or tape
- Scissors
- Pencil
- Markers for drawing details
- Ribbon or twine (optional for a little bow)
Let’s Make a Bunny Lollipop!
Step 1: Cut Out the Ears
Draw two bunny ears on white paper (each about 2–3 inches tall). Cut them out, then cut two smaller pink pieces to glue inside each ear to create the inner ear.
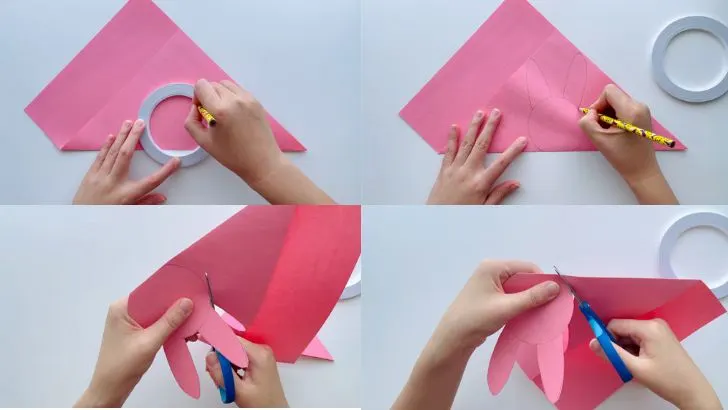
You just need to draw a bunny shape using a pink paper and cut them out.
For this you need to fold a pink paper into a round ring and place it on top of it and draw a bunny shape and then cut out the bunny.
Tip: Let little ones color in the pink part with crayons if you don’t have pink paper!
Step 2: Prepare the Lollipop
Take your lollipop and hold it upright. This will be the bunny’s head.
Step 3: Attach the Bunny Ears
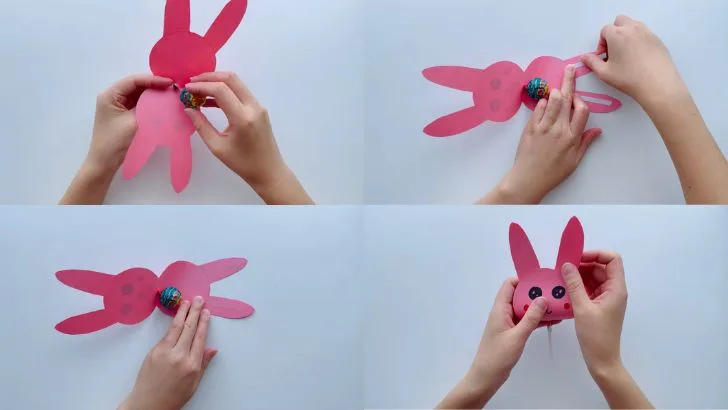
Use a glue stick or tape to attach the ears to the back of the lollipop (just below the wrapper line). Hold them in place for a few seconds so they stick well.
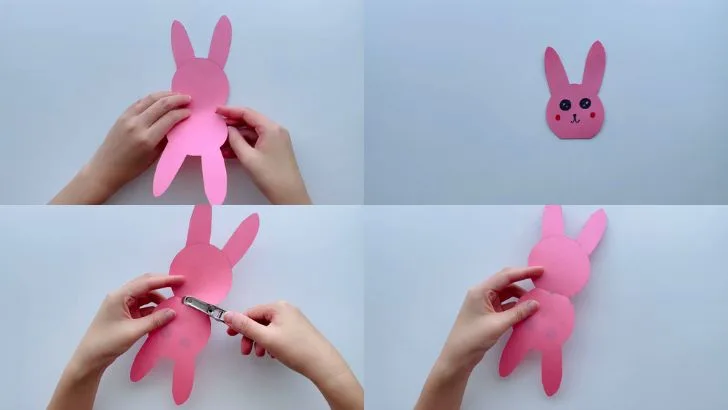
Step 4: Add the Face

Now for the fun part! On the front of the lollipop wrapper, you can add:
Two googly eyes (or draw eyes with a marker)
A tiny pink pom-pom for the nose
Draw a mouth and whiskers underneath
Let your child go wild with bunny expressions — happy, sleepy, silly — each one can be unique!
Step 5: Give It a Tail (Optional)
On the back of the lollipop, glue a small white pom-pom for the fluffy tail.
Step 6: Dress It Up!
Tie a small ribbon or twine around the stick like a bowtie or scarf. This gives your bunny extra personality — fancy bunny, farmer bunny, party bunny, you name it!
Perfect For:
Easter party favors
Classroom treats
Church or Sunday School activities
Easter basket stuffers
Craft day at home
Why Kids Love This Craft:
It’s hands-on and fun
They get to decorate their bunny
It ends with a candy treat!
No big mess, no complicated steps
Bonus Ideas:
Use different colored lollipops for a rainbow of bunnies
Add little paper feet or arms for a full-body bunny
Make a whole bunny lollipop “family” — mommy, daddy, baby bunny!
Final Thoughts:
These Easter Bunny Lollipops are as fun to make as they are to share. Young kids will love putting their own spin on their bunny creations, and parents will appreciate the simple setup and sweet results. Plus, they make adorable Easter gifts that bring smiles and sugar!
So grab your craft supplies and let’s hop to it!
Happy Easter & Happy Crafting!
For more Easter fun and creative craft ideas, check out the rest of our DIY holiday projects!
DIY Easter Bunny Ears Headband
Adorable Bunny Paper Chain Craft for Easter
The Easiest Easter Bunny Craft Using Unmatched Socks
Toilet Roll Easter Bunnies – Adorable DIY Craft for Kids & Parents
Easter Paper Plate Crafts for Kids – DIY Bunny Baskets & Rocking Rabbits!
Easy and Fun Easter Crafts for Kids – DIY Potato Stamp Easter Eggs!
How to Make Beautiful Shaving Cream Eggs
How to Make Popsicle Stick Easter Bunny
Easy Magnetic Levitation with a Pencil
Egg Drop Inertia Science Project: A Fun Physics Experiment for Kids!


