

If you want your loved one’s reaction to be as explosive as the gift itself, this is the DIY project for you!
This Confetti Surprise Card uses a clever elastic band mechanism to launch a personalized photo and a shower of colorful confetti when opened.
This guide will show you exactly how to replicate this impressive interactive card. Grab your supplies and get ready for some crafting magic!
Step 1: Constructing the Outer Sleeve (The Card Housing)
The sleeve is the foundation that houses the mechanism and the big surprise.
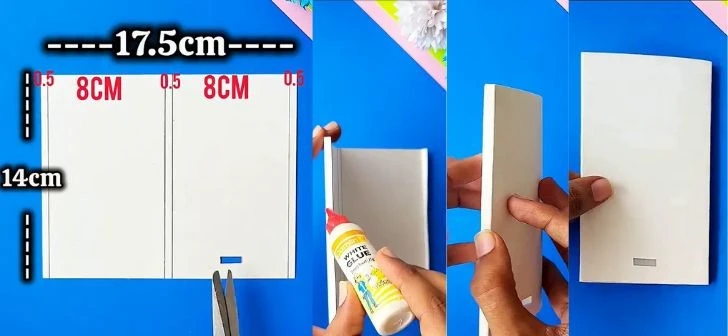
Cut the Cardstock: Start with a piece of sturdy cardstock (you used white). suggests dimensions of 17.5 cm wide by 14 cm high.
Score and Fold: Score the cardstock vertically at 0.5 cm, 8 cm, 8.5 cm, and 16.5 cm. This creates two main 8 cm panels and two narrow 0.5 cm tabs. Fold along all scored lines.
Create the Slot: On the bottom edge of the front panel (the right 8 cm section when laid flat), cut a small, narrow horizontal slot, large enough for a small tab to slide through.
Assemble the Sleeve: Apply glue to the two 0.5 cm side tabs and fold the card closed. This should create a neat, hollow sleeve (roughly 8.5 cm wide by 14 cm high) that opens like a book.
Step 2: Setting Up the Elastic Band (The Power Source)
This small step provides the explosive power for the confetti launch!
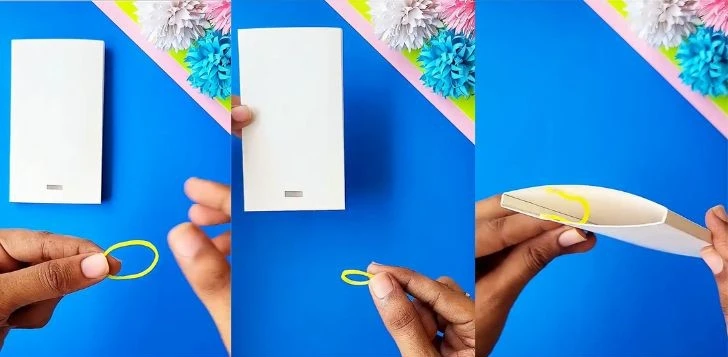
Secure the Elastic: Take a small, strong rubber band or elastic loop (you used a yellow one).
Carefully place it inside the card sleeve, positioning it horizontally across the middle crease (the spine) of the card.
Anchor the Ends: Use strong tape or a tiny dab of super glue to anchor the ends of the elastic band securely to the inside top edges of the sleeve. The elastic should be tight and springy.
Step 3: Preparing the Photo Card (The Projectile)
Your personalized photo needs to be ready to fly!
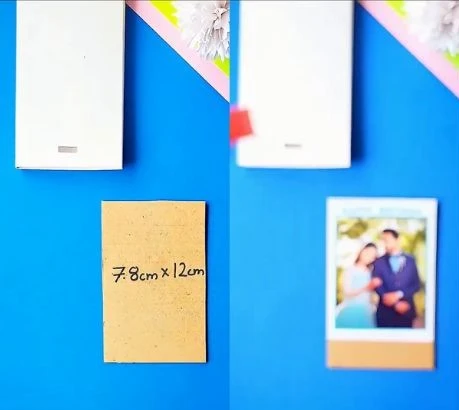
Sizing the Photo: Print your photo (perhaps a happy couple image, as shown) to fit snugly inside the sleeve. The photo card should be slightly shorter than the sleeve’s height.
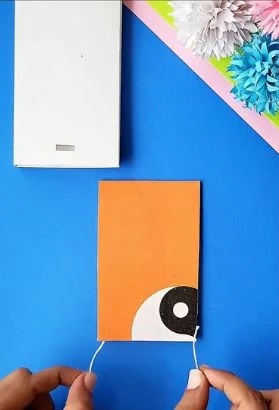
Attach the String Loops: On the back of the photo card, attach two small loops of strong string or thin ribbon near the top corners. These loops should be long enough to hook over the elastic band (installed in Step 2).
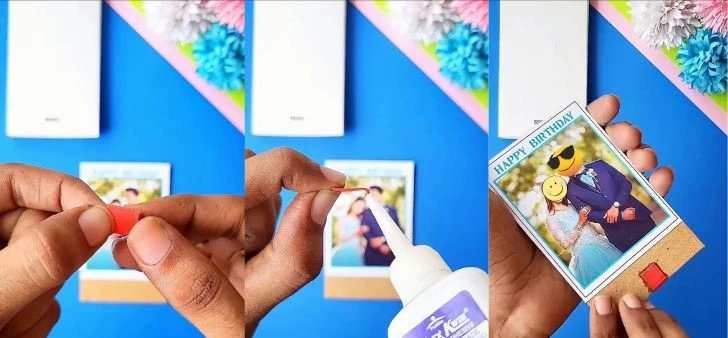
Add the Release Tab: Attach a small, stiff piece of colored paper or plastic (you used a red piece) to the center of the photo card’s bottom edge. This piece will be your release tab that protrudes through the slot you cut in Step 1.
Step 4: Building the Confetti Chamber
The confetti needs a small container to hold it until launch.
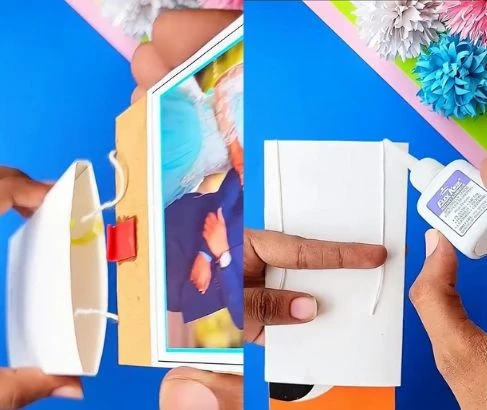
Now you’ll use the box you made in steps 1 and 2. Push the photo card inside the card along with both strong strings through this box.
Now hold this assembly upside down and glue both strong strings to the outer part of the small box (the card housing). This way, when the photo attached card pops up from the card housing, the two strong strings will be able to hold it in place.
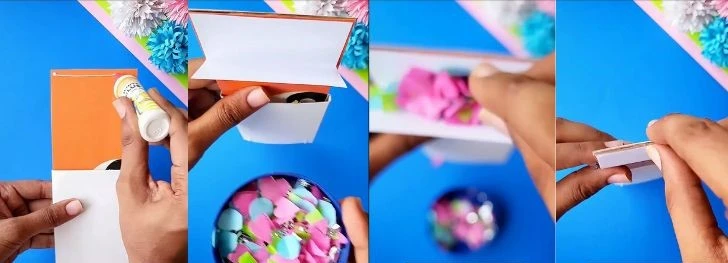
Load the Confetti: Now apply glue in a horizontal line on the back side of the photo-attached card. Stick a piece of paper onto it, fold that paper into a V-shape, and fill it with confetti. You can add pre-cut hearts, squares, or small ribbon pieces inside it.
Carefully attach the photo card with the confetti paper attachment inside the Card Housing using the hook. Gently pull the elastic band over the loops on the back of your photo card.
Step 5: Final Assembly and Charging the Mechanism
This is the tricky part trapping the magic!
Push the photo card all the way down into the sleeve, stretching the elastic band. The release tab should pop through the bottom slot.
Seal the Surprise: While the elastic band is fully loaded and stretched (holding the photo down), carefully glue the flaps of the confetti chamber shut, sealing the mechanism and the confetti inside the sleeve.
The photo card is now held in place by the tension of the elastic and the friction of the chamber.
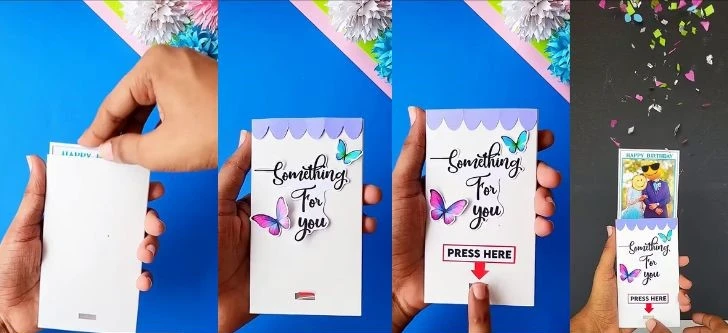
Decorate the Exterior: Decorate the front of the card beautifully. You used an elegant title like “Something For You,” added some charming butterfly stickers, and placed a clear label pointing to the bottom slot: “PRESS HERE.”
When the recipient presses the release tab at the bottom, the tension of the elastic band is instantly freed, causing the photo card to shoot upwards and scatter the confetti into the air a moment of pure, shocking joy!
How to Make an “I Love You” Waterfall Card
How to Create a Fun “Shape Turkey” Math Craft (Free Printable Included!)
The Ultimate Thanksgiving Craft: A Step by Step Guide to Making a Textured Turkey
How to Craft the Ultimate DIY Exploding Love Card
Creative Junk Journal Spreads from a Weekend Getaway
25 Captivating Ideas to Elevate Your Junk Journal Spreads
10 Interactive Junk Journal Ideas to Bring Your Pages to Life
How to Craft Your Own Glowing Ghostface Lamp


