
Looking for a tiny gift that packs a huge punch of personality and charm? This adorable Peek A Boo Slider Card is the perfect way to deliver a sweet, animated message or image. It’s ideal for birthdays, Valentine’s Day, or just surprising a loved one!
The card is structured so that when you pull the sides apart, the central image rotates and reveals a hidden detail like a charming, kissing bear! Here is your step by step guide to crafting this cute and clever mechanism.
Step 1: Preparing the Base and Central Image
The card requires two main components: the sliding base and the rotating image.
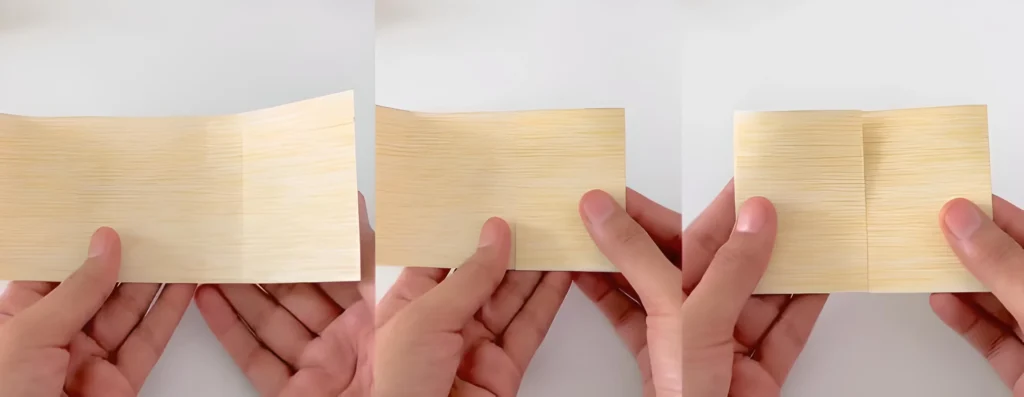
Cut the Base Strip: Start with a long, narrow strip of cardstock for the outer card. You used a light yellow cardstock with a fine wood grain or linen texture, giving it a soft, cozy feel.
Fold the Gates: Fold the strip so that the two ends meet neatly in the center, forming a “gatefold” card.

Prepare the Rotating Image: Print or draw your central image (you used an adorable bear holding a heart).
Place this image on a piece of white cardstock. You will also need a separate, diamond shaped piece of cardstock for the rotation mechanism.
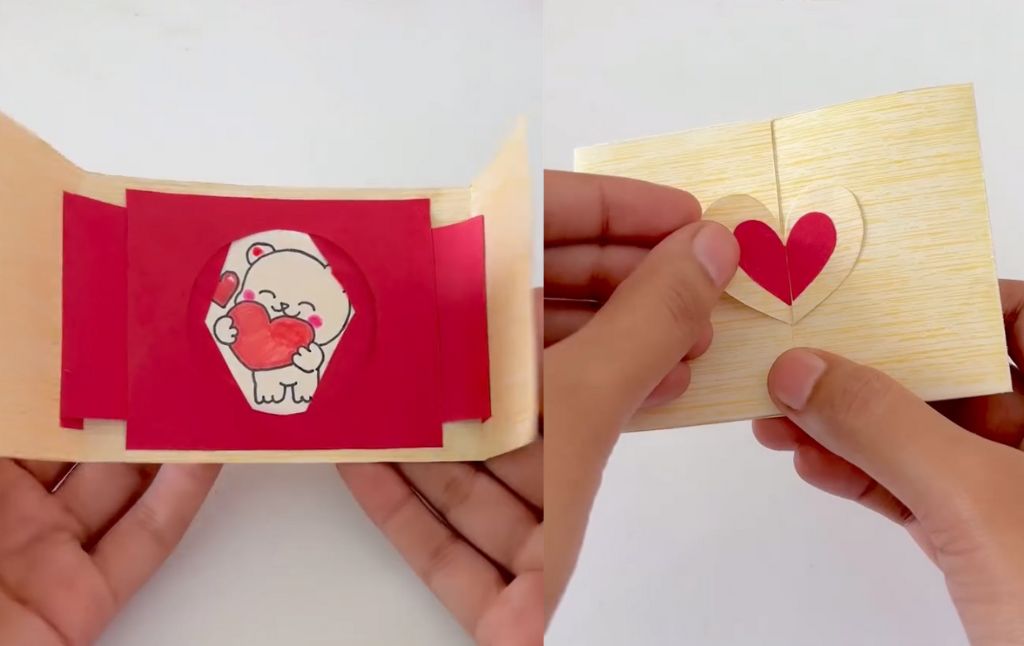
Create the Window: Take a square of red cardstock. In the exact center, cut out a circular window. This will frame your rotating image.
Place the Center Square: Glue the red cardstock square (with the circle cut-out) onto the inside center of your yellow gatefold base.
Step 2: Creating the Rotating Mechanism
This is the clever part that makes the image turn when the card is opened.
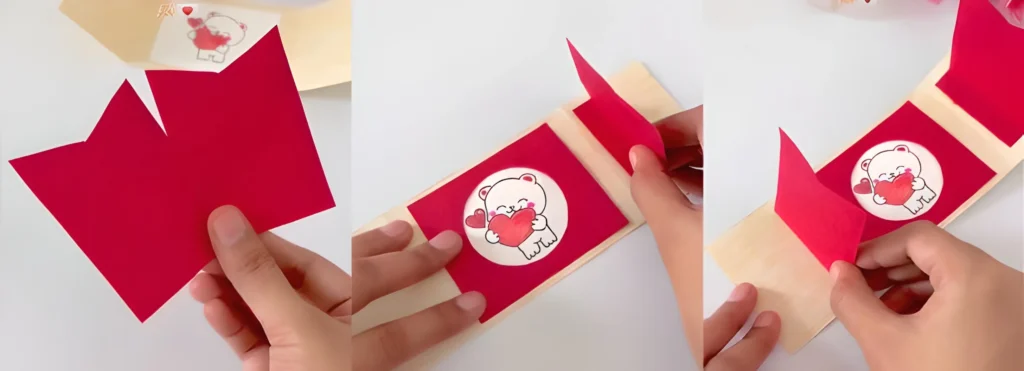
Anchor the Diamond: Take the diamond shaped piece of cardstock. It should be slightly smaller than the red card window. Glue the central image (the cute bear) securely onto this diamond piece.
Build the Folded Sliders: Take two small, square pieces of red cardstock. Using the principles of origami (like a tiny fortune teller fold), fold each piece to create a small, three dimensional corner structure. These folded structures act as the sliders.
Attach the Sliders: Glue one red slider securely to the back left corner of the diamond piece and the other red slider to the back right corner. Important: The sliders must be able to move and fold slightly.
Step 3: Integrating the Rotating Image
Now you attach the image mechanism to the base.
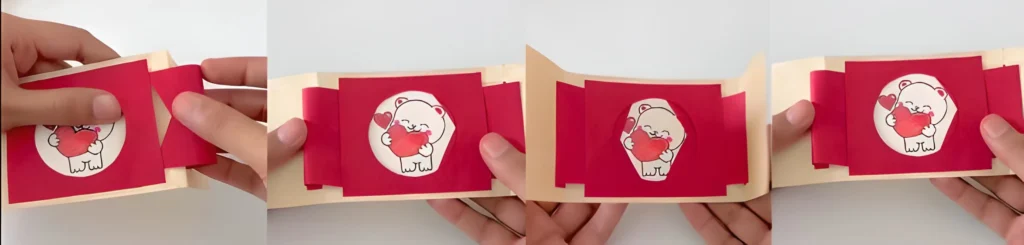
Insert the Diamond: Gently thread the diamond mechanism (with the bear image attached) into the card structure. The red slider folds should rest inside the center fold of the yellow base strip.
Secure the Sliders: When the card is perfectly aligned, glue the edges of the red slider folds to the inside of the yellow card structure. Only glue the edges of the red folds to the yellow base. When you test it, pulling the sides of the yellow card open should cause the diamond and the bear image to rotate and flatten.
Step 4: Adding the Cover Decoration
The exterior design should be inviting and hint at the surprise within.
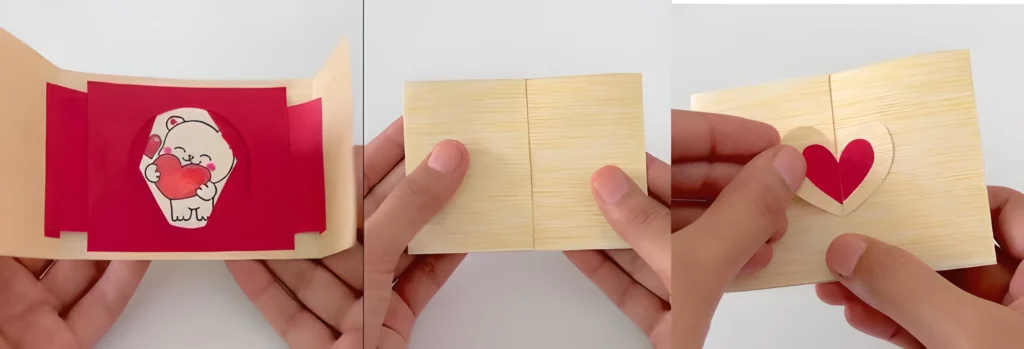
Cut the Cover Heart: Cut a large, red heart. Cut this heart in half vertically.
Attach the Split Heart: Glue one half of the heart to the right flap of the yellow card and the other half to the left flap. When the card is closed, the two halves should align perfectly to form one whole heart.
Final Touches: You added small, hand drawn red hearts to the yellow cover panels, which ties the exterior to the theme of the surprise inside.
The result is a delightful interactive card: When the recipient pulls the card open, the two heart halves separate, and the adorable central image rotates and flips open, delivering a moment of pure, unexpected joy!
How to Craft the Perfect DIY Photo Explosion Birthday Card
How to Make an “I Love You” Waterfall Card
How to Create a Fun “Shape Turkey” Math Craft (Free Printable Included!)
The Ultimate Thanksgiving Craft: A Step by Step Guide to Making a Textured Turkey
How to Craft the Ultimate DIY Exploding Love Card
Creative Junk Journal Spreads from a Weekend Getaway
25 Captivating Ideas to Elevate Your Junk Journal Spreads
10 Interactive Junk Journal Ideas to Bring Your Pages to Life
How to Craft Your Own Glowing Ghostface Lamp


