
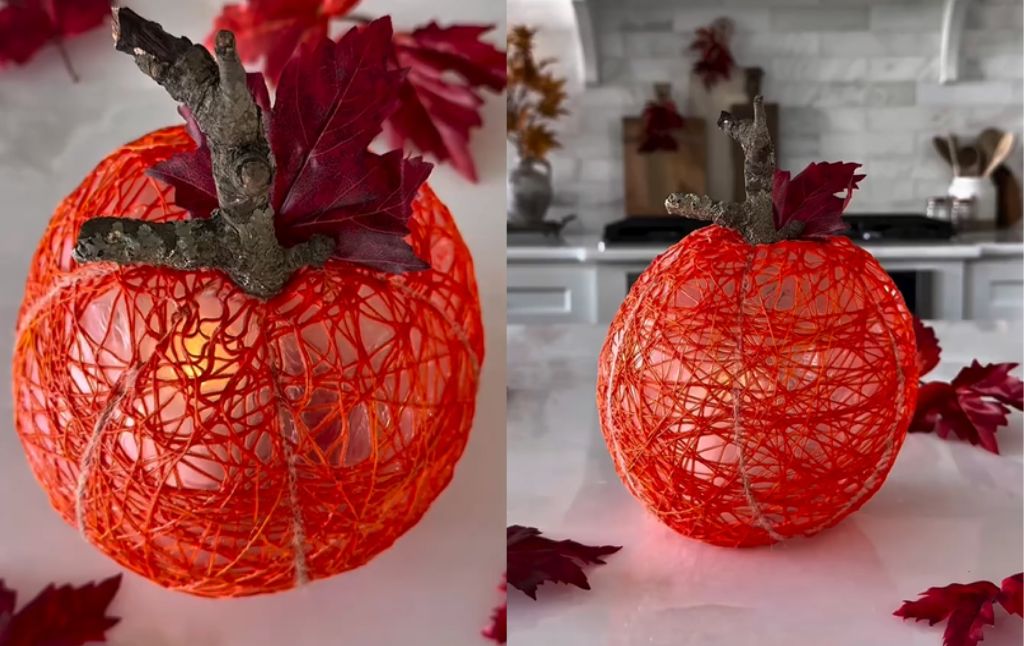
Get ready to craft a piece of autumn decor that is truly enchanting! This beautiful string pumpkin has a delicate, airy look by day and transforms into a magical, glowing lantern by night. It’s a wonderfully creative project that looks far more intricate than it actually is to make.
This is the perfect craft for a cozy fall afternoon, and the stunning result will add a warm and whimsical touch to your home all season long. Let’s get crafting!
What You’ll Need:
- A balloon (a round one works best)
- Orange embroidery floss or thin yarn
- White school glue (like Elmer’s) or Mod Podge
- Water
- A small bowl for the glue mixture
- A paintbrush or spatula
- Twine
- A small, rustic-looking twig or piece of a branch for the stem
- A hot glue gun
- Faux autumn leaves for decoration
- Battery powered fairy lights
Step-by-Step Instructions
Step 1: Prepare Your Balloon and Glue Mixture
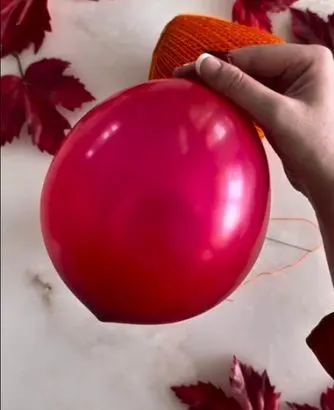
Start by blowing up your balloon to the size you’d like your pumpkin to be. In a small bowl, mix your white glue with a little bit of water to create a slightly thinner, more spreadable consistency.
Step 2: Wrap the Balloon
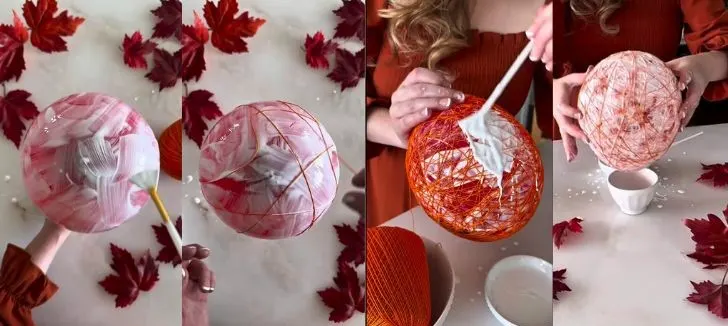
Now for the fun (and messy!) part. Using your paintbrush, coat the entire surface of the balloon with a thin layer of the glue mixture. This will help the first layer of string stick.
Take your orange string and begin wrapping it around the balloon in a random, crisscrossing pattern. Continue wrapping until the balloon is well covered, creating a web like effect. The more you wrap, the more solid your pumpkin will be.
Once you’re happy with the coverage, go over the entire string covered balloon with another generous coat of your glue mixture, making sure every strand is saturated.
Step 3: Shape the Pumpkin
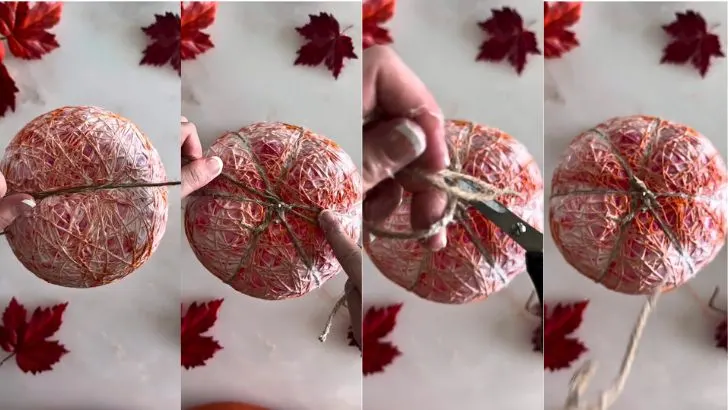
To give your creation that classic pumpkin shape, take a few pieces of twine and wrap them vertically around the string ball, pulling them slightly taut to create indentations.
Tie them securely at the top and bottom. Let the entire thing dry completely this is very important and may take up to 24 hours.
Step 4: The Big Reveal
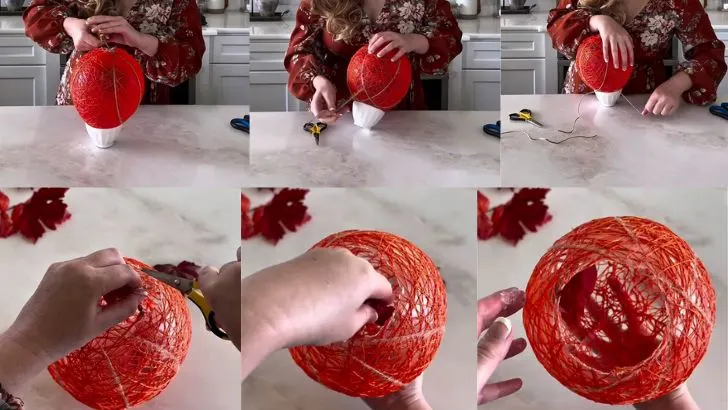
Once the string is completely dry and hard to the touch, it’s time to remove the string and balloon. Carefully snip a small hole near the knot of the balloon to let the air out slowly.
Once it deflates, gently separate it from the inside of the string shell. To do this, make a round hole so you can pull the balloon out. Through this hole, you can place the light inside the string pumpkin.
Step 5: Add the Stem and Leaves
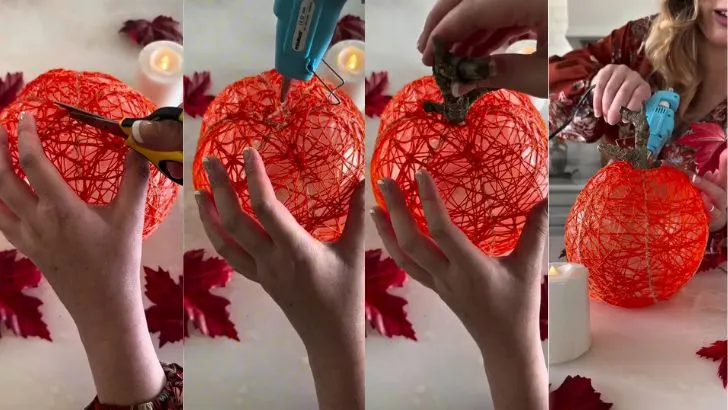
Now, let’s turn your string orb into a proper pumpkin! make a small hole on the top of the string pumpkin so you can insert a rustic twig and secure it with the help of a hot glue gun.
Add a few beautiful faux autumn leaves around the base of the stem for a perfect finishing touch.
Step 6: Let It Glow!
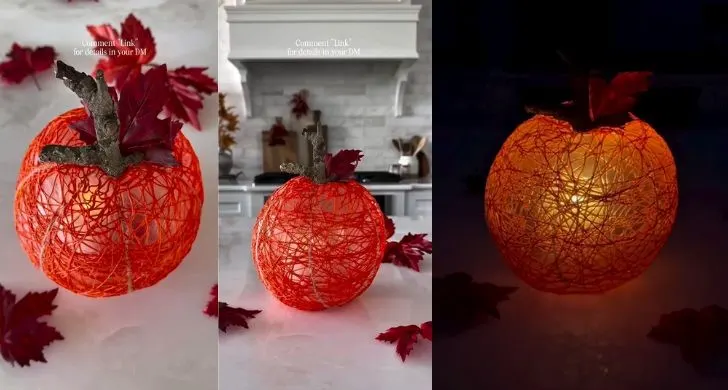
For the final, magical step, carefully tuck your string of battery powered fairy lights inside the pumpkin. Turn them on, dim the lights in the room, and watch your beautiful creation come to life with a warm, enchanting glow.
Your glowing string pumpkin is now ready to be the star of your autumn decor. Happy crafting
Capture the Beauty of Autumn with These DIY Clay Leaf Bowls
Create a Colorful Paper Turkey for Thanksgiving!
Build Your Own Amazing Dancing Robot!
Craft a Wicked Animated Eyeball Spellbook for Halloween
Create Adorable Upcycled Ghost Portraits for Halloween
Create Your Own Spooky & Glowing Ghost Family This Halloween!
Create Your Own Spooky Glowing Ghosts


