
As the air gets crisper and the nights grow longer, it’s the perfect time to fill your home with a little handmade Halloween magic.
Forget complicated projects these simple and stunning DIYs are perfect for a cozy afternoon of crafting.
From glowing lanterns to mystical candles, you can transform your space into a festive haunt in no time.
Ready to get started? Let’s make something spooky!
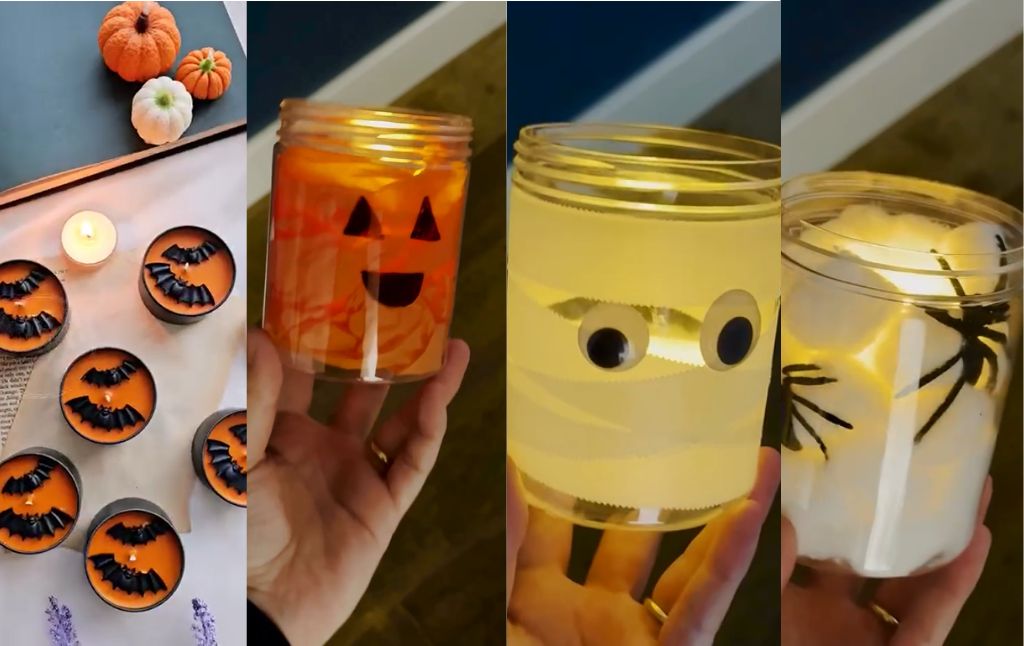
Part 1: The Glowing Jar Lantern Trio
These incredibly simple jar lanterns are a fantastic way to add a quick and charming glow to any room.
Using just a few basic supplies, you can create a Jack o’ Lantern, a mummy, or a creepy crawly spider web jar.
What You’ll Need for All Three:
- Clear plastic or glass jars
- Battery operated LED tea lights
1. The Classic Jack o’ Lantern Jar
Supplies: Orange tissue paper, black permanent marker.
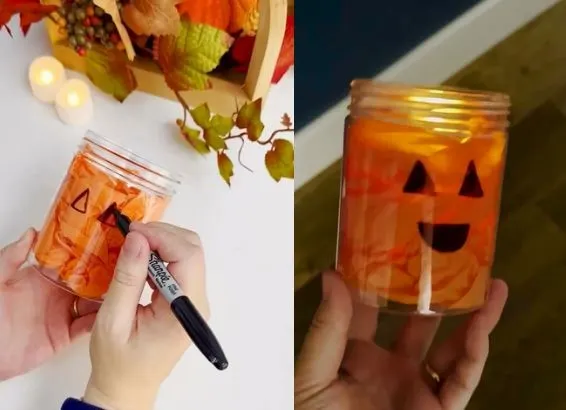
Fill the Jar: Gently scrunch up pieces of orange tissue paper and fill your jar. Don’t pack it too tightly you want the light to diffuse through it beautifully.
Draw the Face: Take your black permanent marker and draw a classic Jack o’ Lantern face two triangle eyes, a nose, and a toothy grin on the outside of the jar.
Light It Up: Place your LED tea light on top of the tissue paper, and you’re done! An instant, cheerful pumpkin glow.
2. The Adorable Mummy Jar
Supplies: White medical tape (or masking tape/gauze), googly eyes.
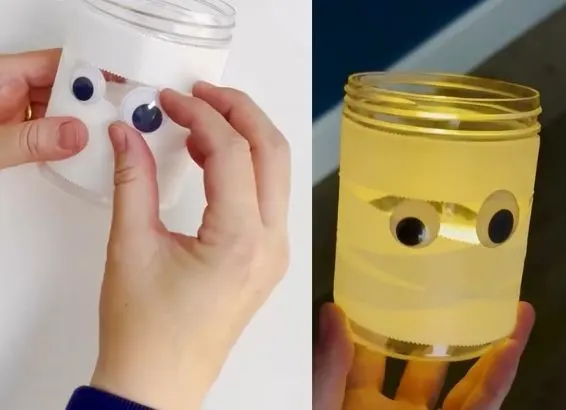
Wrap It Up: Starting from the bottom, wrap your jar with the white tape in a slightly messy, overlapping pattern to mimic mummy bandages. Leave a small gap near the top for the eyes.
Add the Eyes: Stick two googly eyes in the gap you left. They’ll peek out adorably from between the “bandages.”
Bring it to Life: Drop an LED tea light inside for a friendly, mummified glow.
3. The Creepy Spider Web Jar
Supplies: Cotton balls, small plastic spiders.
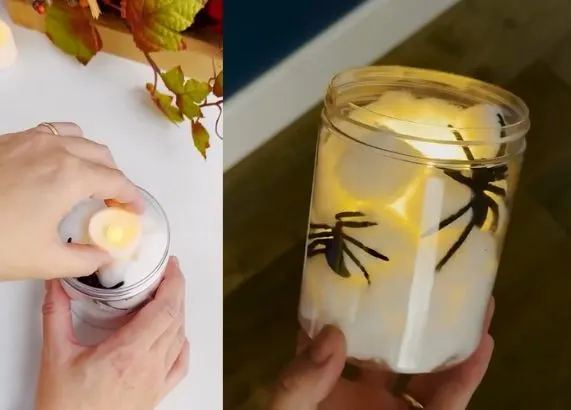
Create the Webs: Take cotton balls and gently pull and stretch them apart until they look like wispy, spooky spider webs.
Fill and Infest: Fill your jar with the stretched out cotton. As you go, nestle a few plastic spiders inside, pressing some against the sides of the jar so they are visible.
Add an Eerie Glow: Place your LED tea light inside to illuminate your creepy, crawly creation.
Part 2: The Mystical “Hocus Pocus” Bat Candle
For a decoration that’s both beautiful and functional, try your hand at making this enchanting Halloween themed candle.
It’s easier than it looks and makes a wonderful gift or a centerpiece for your spooky décor.
What You’ll Need:
- A small, round metal tin with a lid
- Candle making wax (orange, or white wax with orange dye)
- A candle wick with a metal base
- A popsicle stick or wick centering tool
- Heat safe, bat shaped wax melts or sprinkles
- A themed sticker (like “Hocus Pocus”) for the lid
Step by Step Instructions:
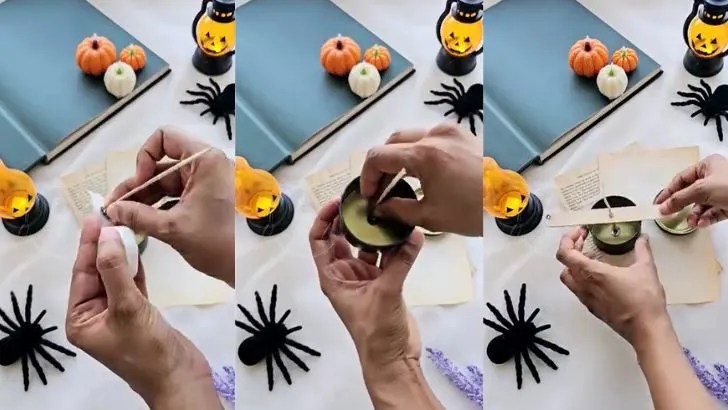
Prepare the Wick: Secure the metal base of your wick to the center of the tin’s bottom. You can use a dab of hot glue or a wick sticker.
Thread the top of the wick through the hole in a popsicle stick and lay the stick flat across the top of the tin. This will keep your wick perfectly centered and upright.
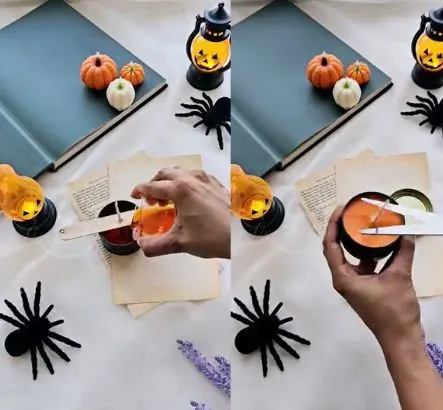
Pour the Wax: Carefully melt your orange candle wax according to the package instructions.
Safety first! Hot wax can cause burns, so adult supervision is highly recommended. Once melted, slowly and carefully pour the wax into your prepared tin, filling it almost to the top.
You can trim the wick to about a quarter inch above the wax.
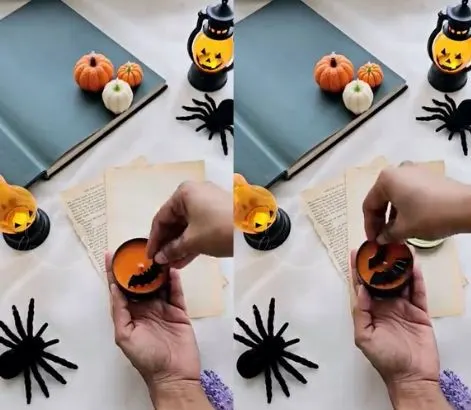
Add the Bats: Allow the wax to cool for a few minutes. You want the surface to start solidifying but still be soft.
Gently place your bat shaped wax melts on top of the semi set wax, arranging them in a spooky flight pattern.
Let it Set: Leave the candle in a safe place to cool and harden completely. This can take a few hours. Once it’s fully set,

Decorate the Lid: For the final magical touch, place your “Hocus Pocus” or other Halloween themed sticker right in the center of the lid.
Your mystical bat candle is now ready to cast a bewitching, scented glow over your Halloween festivities.
How to Make a Spooky Halloween Jar Lantern
Seven Pumpkin Creative Painting Ideas for Halloween!
3 Creative No Carve Pumpkin Painting Ideas for Halloween
3 Creative and Unique Pumpkin Carving Ideas for Halloween
3 Beautiful and Easy Fall Leaf Crafts for Kids
All About Apples: A Fun, Hands On Learning Craft for Kids!
Dive into Fall with 5 Fun Apple Investigation Activities!
A Fun and Educational Apple Life Cycle Craft
Create a Magical Glowing String Pumpkin for Your Autumn Decor


