

Are you looking to add a little extra magic to your junk journal or scrapbook? Moving beyond flat pages and creating interactive elements can turn your journal from a simple book of memories into a hands on experience.
These little pockets, flaps, and pull-tabs invite you to play with the page and discover hidden treasures within.
If you’re ready to make your journal more dynamic, here are five creative and inspiring ideas to get you started.
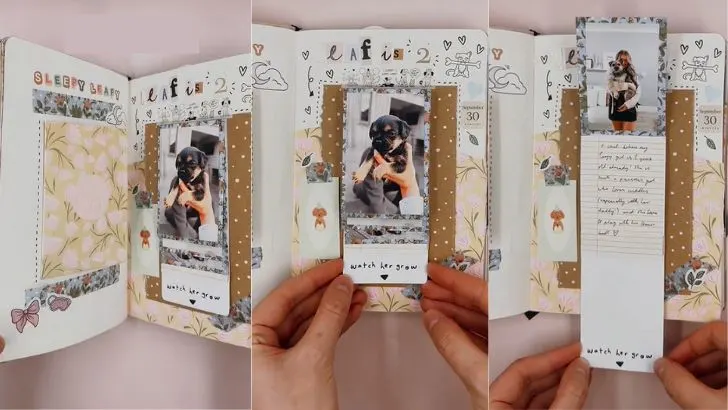
1. The Waterfall Photo Flip Book
This is a beautiful way to show a sequence of events, like a pet growing up, a vacation timeline, or a year in review.
As you pull the tab, each photo gracefully flips over to reveal the next, creating a captivating cascading effect.
How to create it:
Create the Mechanism: Start with a sturdy piece of cardstock as your base. Cut a long, narrow strip of paper that will serve as your pull tab.
Then, cut a slightly wider, shorter piece to act as a horizontal “band” that will hold the photos in place.
Assemble the Base: Glue the band horizontally across the middle of your cardstock base, only gluing down the two short ends.
This creates a channel for your pull tab to slide through.
Prepare Your Photos: Print and cut your photos, making them all the same width. You can even use a final piece of lined paper for a hidden journaling spot.
Attach the Photos: Starting with the photo you want to be at the bottom of the cascade, attach its top edge to the bottom of the pull tab strip.
Place the next photo slightly above it, overlapping it, and attach its top edge to the pull tab. Continue this process until all your photos are attached in a vertical, overlapping stack.
Install and Decorate: Slide the pull tab mechanism under the horizontal band on your base.
Glue the entire base onto your journal page and decorate around it. Add a title like “Watch Me Grow” or “Our Adventure” to the pull tab.
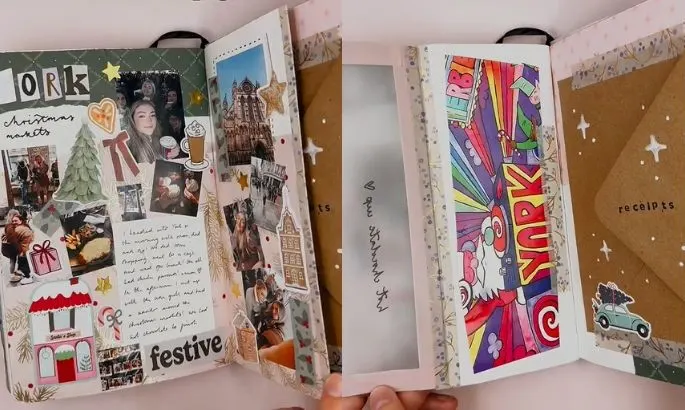
2. The Multi Panel Fold Out Page
Sometimes, one page just isn’t enough to capture a big memory. A fold out page gives you extra real estate for more photos, journaling, and decorations, creating a “wow” moment when it’s opened.
How to create it:
Create the Flap: Cut a piece of decorative paper that is the same height as your journal page but narrower in width.
Score and fold a small ½-inch seam along one of the long edges. This will be your hinge.
Attach the Flap: Attach the folded hinge to the edge of your main journal page using strong glue or decorative washi tape. This will allow the new page to fold in and out smoothly.
Decorate Both Sides: Treat the fold out as a mini two page spread. You can create a “window” on the front that hints at what’s inside.
Then, create a full collage of photos, tickets, and notes on the inner panel that is revealed when you open it.
Complete the Spread: Don’t forget to decorate the main journal pages. You can add an envelope for receipts on the opposite page or continue the theme across the entire spread for a cohesive look.
3. The Interactive Envelope Page
Tuck away private thoughts, small mementos, or little notes about your day with this charming envelope page. It’s a perfect way to add dimension and keep smaller, precious items safe and sound.

How to create it:
Choose Your Envelopes: Select a few small envelopes that fit nicely on your journal page. Simple brown craft envelopes work wonderfully.
Create a Hinge: Use a strip of sturdy, decorative washi tape to attach the side of each envelope to the page. This creates a flap that you can open and close.
Decorate and Label: Decorate the front of the envelopes with stickers, stars, or cutout letters to create a title like “Stuff We Did” or “Little Moments.”
Add Your Notes: Write your memories on small pieces of paper or sticky notes. You can either tuck them inside the envelope or, for a fun twist, stick them to the inside of the envelope flap for an instant reveal.
4. The Goal Tracking Bingo Board
Turn your goals and bucket list items into a fun game! This bingo board is a visually satisfying way to track your progress throughout the year.
As you complete a task, you get to place a marker and get one step closer to “BINGO!”
How to create it:
Design Your Board: On your journal page, draw a 5×5 grid. Write “BINGO” across the top and give it a title, like “2025 Bucket List.”
Fill in Your Goals: In each square, write a goal you want to accomplish. These can be big (“Visit a new country”) or small (“Read 30 books”).
Create Sticker Markers: On a separate page, create a small pocket or envelope to hold your bingo markers. Make custom stickers that correspond to your goals, or simply use a variety of cute, small stickers.
Add a Protective Overlay (Optional): Hinge a piece of vellum or acetate paper over your bingo board with washi tape at the top. This protects the page while adding a beautiful, layered look.
Play Bingo! Every time you achieve a goal, open your marker envelope, choose a sticker, and proudly place it on the corresponding square.
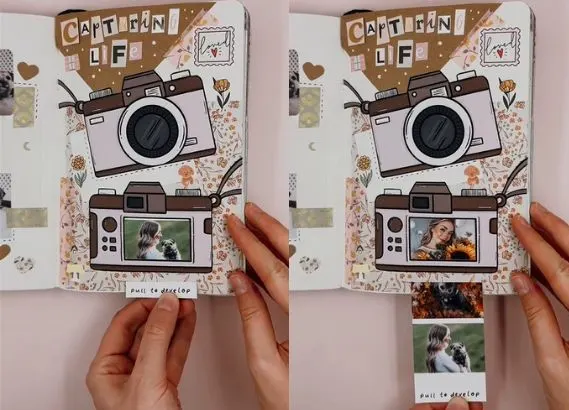
5. The Pull Tab Camera Photo Strip
This is a wonderfully playful design that mimics the magic of an old school camera. A simple pull reveals a strip of beloved photos, as if they are developing right before your eyes.
How to create it:
Create the Camera Art: Draw, print, or use a sticker of a camera on your journal page. For this interactive element, you will want two cameras a larger one on top and a smaller one below it.
Cut the Slot: On the smaller, bottom camera, carefully use a craft knife to cut a thin, horizontal slit where the photo would emerge.
Make the Photo Strip: Print a series of small, square photos in a single vertical column on a long strip of paper or thin cardstock. At the bottom of the strip, create a small tab and write “Pull to Develop” on it.
Assemble with Care: Apply glue to the back of the bottom camera, but be very careful to leave the area around the slit and the center of the camera free of glue. This creates a hidden pocket.
Insert and Enjoy: Press the camera onto your page. Once dry, thread your photo strip up through the bottom of the page and out of the slot you cut. Now, you can pull the tab to reveal your cherished memories one by one.
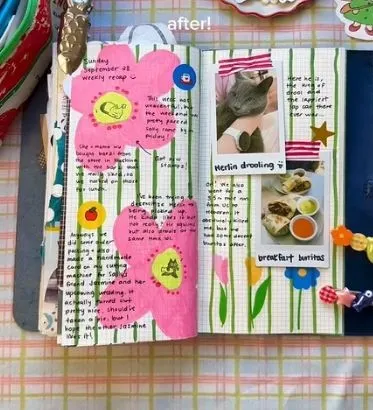
6. Design Your Own Bold Background
Instead of relying on scrapbook paper, why not become the designer of your own pages? Creating a hand drawn background is simple, fun, and makes your journal uniquely yours.
Start with a Simple Shape: Grab your favorite colorful markers and choose an easy, bold shape to repeat.
Big, graphic flowers are a great choice. Start by drawing the center in one color, then outline and fill in the petals with another. Don’t worry about making them perfect!
Add a Pattern: Once your main drawings are done, fill the remaining white space with a simple pattern. Think vertical or horizontal stripes in a complementary color. This ties the whole page together.
Layer Your Memories: After the ink is dry, your custom page is ready! This vibrant background is the perfect stage for photos, handwritten notes, and small stickers. You’ll be amazed at how your own art makes your memories pop.
7. Create a “Stamp Collection” from Your Travels
Commemorate a trip or a special event by turning your paper mementos into a charming stamp collection. All you need is a stamp shaped craft punch.
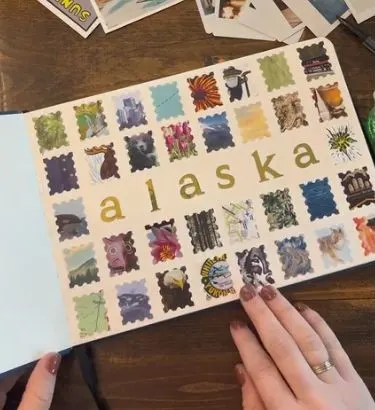
Gather Your Materials: Collect brochures, maps, ticket stubs, and postcards from your adventure.
Punch Out the Details: Use your stamp punch to carefully select and cut out small, interesting vignettes from your papers a snippet of a map, a cool logo, a beautiful image, or a piece of text.
Create a Grid: On your journal page, use a pencil and ruler to lightly draw a grid. This will help you line up your “stamps” for a clean, organized look.
Arrange and Title: Glue your paper stamps into the grid, leaving a blank space in the center. In that space, write the name of the location or event, like “Alaska” or “Summer Fair,” to title your collection.
8. The “Everyday Ephemera” Collage
Some of the best journal pages capture the feeling of a single, ordinary day. This layout celebrates the small, disposable items that tell the story of your life.
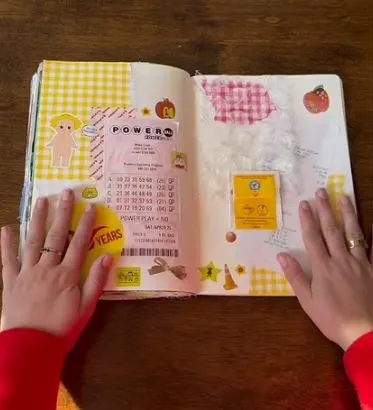
Collect Your Scraps: Throughout your day, save small items you’d normally throw away: a coffee shop receipt, a tea bag wrapper, a bus ticket, a clothing tag, or even a lottery ticket.
Build Your Base: Start by tearing and gluing down pieces of patterned paper to create a colorful foundation. Asymmetrical, torn edges add wonderful texture.
Layer Your Moments: Arrange your collected items on the page. Layer them over each other, incorporating different textures like a piece of bubble wrap or crinkled paper for added interest.
Add Final Touches: Finish the page with a few small stickers or doodles. This layout isn’t about telling a linear story but about capturing a snapshot of a moment in time.
9. The Full Page Takeover
For a layout that is both incredibly simple and visually complex, use a single large piece of paper as your entire background.
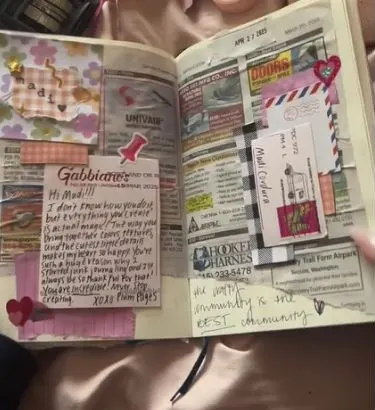
Find Your Feature Page: Look for a full page from a newspaper (the classifieds are great for this!), a page from an old book with interesting text, or a vintage magazine ad.
Glue It Down: Carefully apply glue to the back of the page and lay it across your two page journal spread. Smooth out any bubbles and trim the edges to fit perfectly.
Create on Top: You now have an instant, textured background! Use this canvas to feature your main journaling entry.
You can paste a handwritten note on top, layer on some mail art from a friend, or create a small cluster of photos and stickers. The busy background adds depth and makes your focal points stand out.
10. The Interactive “Scan Me” Page
Add an element of surprise to your journal with an interactive, lift the flap page. This technique is perfect for hiding a private thought, a funny photo, or a special memory.
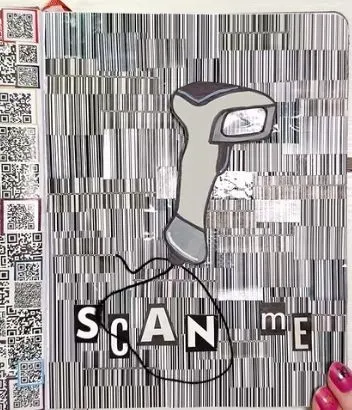
Pick a Theme: This layout works great with a fun theme. For example, use barcode patterned washi tape or paper to cover your entire page. Add letter stickers that say “SCAN ME.”
Create Your Flap: Draw, color, and cut out an object that fits your theme, like a barcode scanner. This will become your flap.
Hide Your Secret: On the page, decide what you want to hide underneath the flap. You can write a secret message directly on the background or paste a small photo there.
Make It Interactive: Attach your cutout using a small piece of washi tape to create a hinge, or for a fun twist, use tiny velcro dots.
This allows you to lift the flap (or remove it entirely) to reveal what’s hidden underneath. Add fun details, like a piece of black thread for the scanner’s “cord.”
10 Inspiring Junk Journal Spreads to Try Today
Create a Spooktacular Light Up Halloween Card: A Step by Step Guide
How to Craft a Stunning Autumn Leaf Bowl
A Spooktacular DIY Jack Skellington Lantern
Fun & Easy Halloween DIYs Glowing Jar & Bat Candle
2 Spooky & Easy DIY Glowing Jars for Halloween
5 Creative No Carve Pumpkin Painting Ideas for a Spooktacular Halloween!
3 Spooktacular and Creative Pumpkin Carving Ideas for Halloween
3 Whimsical Autumn Leaf Crafts to Make with Kids
3 Fun and Easy Fall Tree Crafts for Kids (with Free Printable!)


