

Transform a simple sheet of paper into an elegant, glowing sphere with this beautiful origami project.
Perfect as a delicate piece of home decor, a soothing night light, or a handmade gift, this eight-petal sphere is both mesmerizing to look at and satisfying to create.
Ready to try it yourself? Let’s get folding!
What You’ll Need:
- A rectangular piece of paper (the guide uses 24.8 x 10.3 cm)
- A ruler and pencil
- Scissors
- Paper glue
- Small, battery-powered LED fairy lights (optional, for the glowing effect)
Step-by-Step Instructions
Step 1: Prepare Your Paper
Start with your rectangular paper. Along one of the long edges, make a very narrow fold, about 0.4 cm wide.

This will be your glue tab later. Now, take the remaining larger section of the paper (which should be 24.4 cm) and fold it accordion style into eight equal vertical panels.
You can do this by folding the paper in half three times to create eight perfectly even sections.
Step 2: Create the Petal Shape
Unfold your paper. To create the curved petal shape, you’ll need a template. Cut a small piece of scrap paper that is the same width as one of your eight panels.
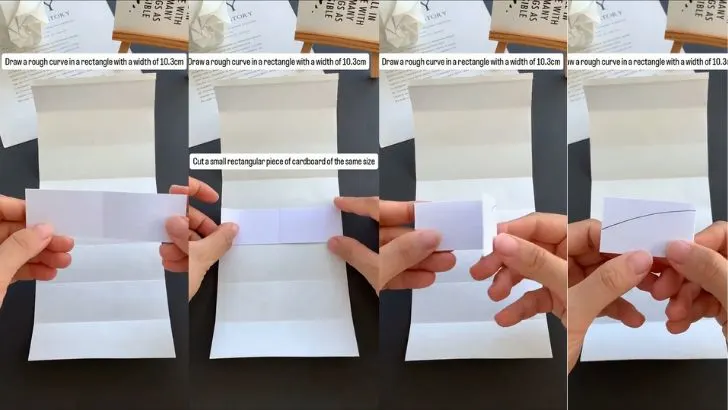
On this template, draw a gentle, shallow curve from one corner to the other and cut it out.
Place this curved template on the first panel at the end of your paper strip and trace the curve with a pencil.
Repeat this for all eight panels, making sure the curves are all facing the same direction. Once all curves are drawn, neatly cut along the lines.
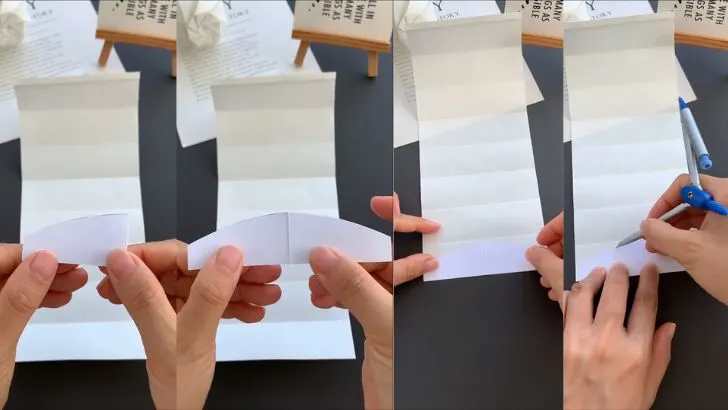
Step 3: Pre Crease the Folds
With your paper now shaped with eight curved “petals,” it’s time to reinforce the folds.
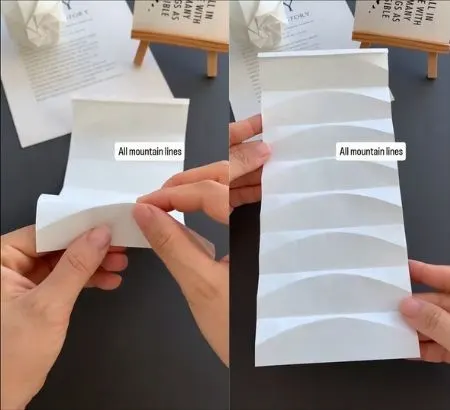
Unfold the paper completely and make sure all eight vertical creases are folded as “mountain folds” meaning the crease should stick up like the peak of a mountain when the paper is laid flat. This will help the sphere take shape later.
Step 4: Form the Cylinder
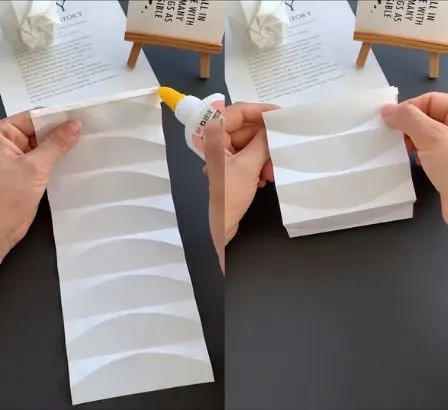
Apply a thin line of glue to the small 0.4 cm tab you created in the first step. Carefully bring the two ends of the paper strip together to form a cylinder, pressing the glued tab securely to the inside of the other end.
You should now have an eight sided paper tube with a scalloped, petal like edge.
Step 5: Shape the Sphere

This is where the magic happens! Gently begin to push the points of the eight petals inward and toward the center.
The creases you made will naturally want to twist into a spiral pattern. Carefully guide them with your fingers until they meet in the middle, forming a beautiful geometric spiral.
Step 6: Add the Lights and Finish
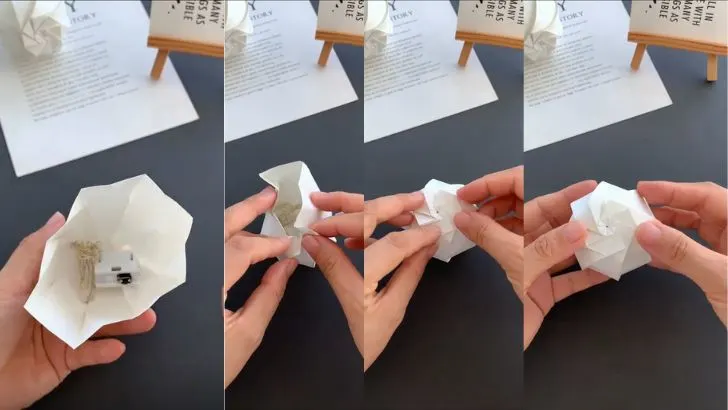
Before closing the second side, take your battery-powered fairy lights and carefully tuck them inside the sphere.
Now, repeat the process from Step 5 on the other side, gently pushing the bottom edges inward until they form another spiral and close the sphere completely.
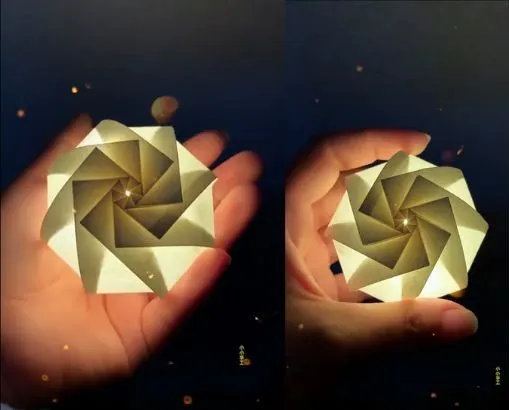
You’ve now created a stunning paper petal sphere! Place it on a shelf or desk, and when you turn on the lights in a dim room, it will cast a warm, beautiful glow.
Kids Activities
Looking for more fun kids activities and other ideas to keep kids engaged, learning, and having fun? Check out these:
DIY Rainbow Projector Phone Flashlight Rainbow Hack
Craft a Magical Color-Reveal Card to Wow Your Loved Ones!
Create Magic Color-Reveal Art with This Simple Trick!
DIY Magic Flashlight: Reveal Hidden Pictures with this Fun Craft!
Create an Amazing Rainbow Bubble Snake: A Fun and Easy DIY Toy!
Unleash Your Child’s Inner Artist with this Magical DIY Projector!
Splat! Create a Hilariously Fun Poppable Bug Craft


